Introduction
In the ever-changing world of cloud computing, ensuring your resources are working well is important. Oracle Cloud Infrastructure (OCI) has a cool way to keep an eye on things using alarms. These alarms help you stay ahead of any issues and manage your cloud stuff better. One awesome thing about OCI alarms is how they team up with topic-based notifications. It’s like having a special way to send important alerts exactly where they need to go and when they need to get there.
In this guide, we’ll delve into understanding and setting up OCI alarms with topic-based notifications, exploring the seamless integration that adds a layer of intelligence to your cloud resource monitoring strategy.
Creating the Notification Topic
Creating a notification topic in Oracle Cloud Infrastructure (OCI) is an essential step when setting up alarms. Notification topics serve as the endpoint for receiving notifications triggered by alarms. Here are several reasons why you would want to create a notification topic:
Centralized Notification Handling: Notification topics provide a centralized way to manage and handle notifications. You can create a notification topic and configure it with one or more alarms instead of doing it directly within each alarm. This will lead to a more organized approach to handling notifications.
Reusability: The created notification topic can be used in multiple alarms this will reduce redundancy and make it easier to manage notifications by associating the notification preferences for different alarms
Support for Multiple Destinations: Notification topics support various destination types, including email, PagerDuty, Slack, and more. Instead of modifying alarms individually, these can be chosen for different alarms by notification topic.
Separation of Concerns: Notification topics allow you to separate the configuration of alarms (monitoring conditions) from the configuration of notifications. This separation of concerns makes it easier to understand and manage your monitoring and notification setup.
Integration with External Services: When you create a notification topic, you can integrate it with external services through subscriptions. For example, you can subscribe to an email address, a webhook, or a messaging platform. This flexibility makes it easy to connect OCI monitoring with external tools and processes.
Scalability: As your monitoring needs grow, having a centralized mechanism for handling notifications becomes increasingly important. Notification topics provide a scalable solution that can adapt to changes in your environment without the need to update individual alarms.
Steps to create a Notification Topic in OCI Console are as follows,
- Login to OCI console.
- Navigate to Developer Services –> Application Integration –> Click Notifications.
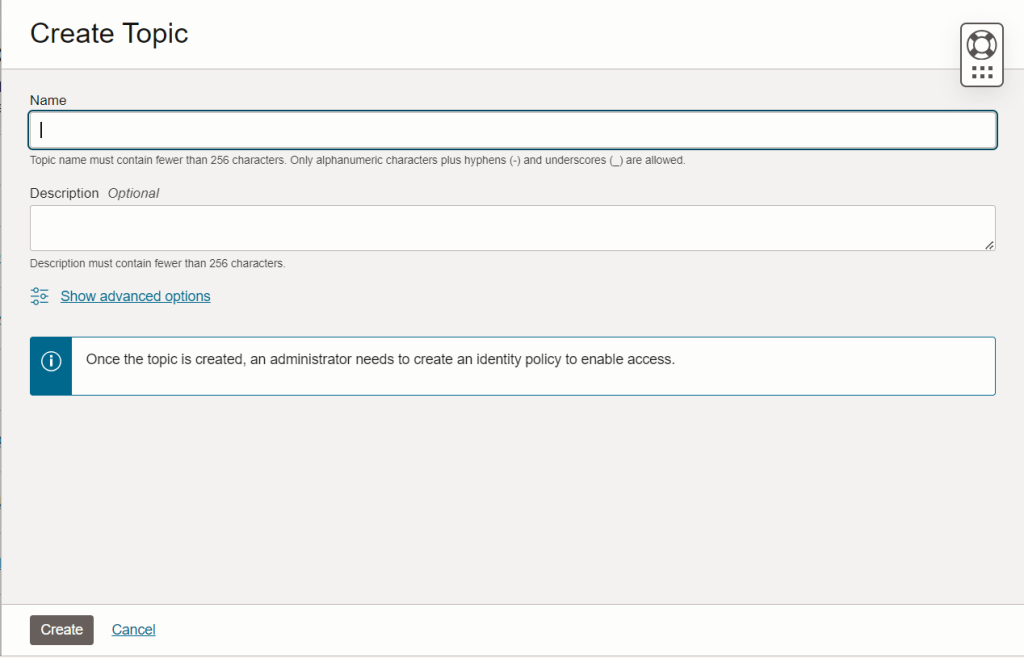
- Click Create Topic.
- Enter the Name of the topic (Example: Infra Alerts) and click Create.


Creating Subscriptions for Notification Topics
Subscriptions allow you to seamlessly connect your OCI notification topics to external services, enhancing the versatility of your alerting system. Subscriptions define where the notifications triggered by alarms should be sent, and they enable you to integrate OCI alarms with external services.
Steps to Create a Subscription for Notification Topic:
- Go to the created Notification Topic.
- Under Resources –> Go to Subscription.
- Click Create Subscription.

- Select the desired Protocol available protocols are Email, HTTPS, PagerDuty, Slack, and SMS.
- And enter the endpoint for the selected protocol.

OCI Alarms:
In the dynamic world of cloud computing, the ability to monitor and manage resources effectively is paramount. Oracle Cloud Infrastructure (OCI) provides a robust solution through alarms, empowering users to proactively respond to changes in the state of their cloud resources. In this guide, we’ll explore the significance of OCI Alarms and how they form the cornerstone of a comprehensive cloud resource monitoring strategy.
Why OCI Alarms?
Stay Ahead with Proactive Monitoring
OCI Alarms lets you keep an eye on your cloud resources by setting conditions that trigger alerts. Instead of reacting to issues after they happen, alarms empower you to act before potential problems get serious.
Tailor Alerts to Your Needs
OCI Alarms are flexible – you can customize them for various monitoring conditions. Whether it’s tracking CPU usage, network traffic, or other performance metrics, you have the power to set conditions that fit your specific resource and application requirements.
Get Instant Alerts with Real-time Notifications
Configure OCI Alarms to send instant notifications when conditions are met. This means you’ll be immediately informed about critical events, giving you the chance to respond quickly and minimize any impact on your infrastructure.
Streamlined Notification Management with Notification Topics
OCI Alarms work seamlessly with Notification Topics, making it easy to manage and customize notification settings in one central place. This integration allows you to send notifications to different destinations like email, webhooks, PagerDuty, and more.
Steps to Create Alarm in OCI
Firstly, identify the metrics which required to set up an alarm like CPU, disk space, etc. OCI offers a various type of metrics that monitor the OCI resources.
Step 1: Access the OCI Console
- Log in to the OCI console.
- Navigate to Observability & Management –> Monitoring –> Alarm Definitions.

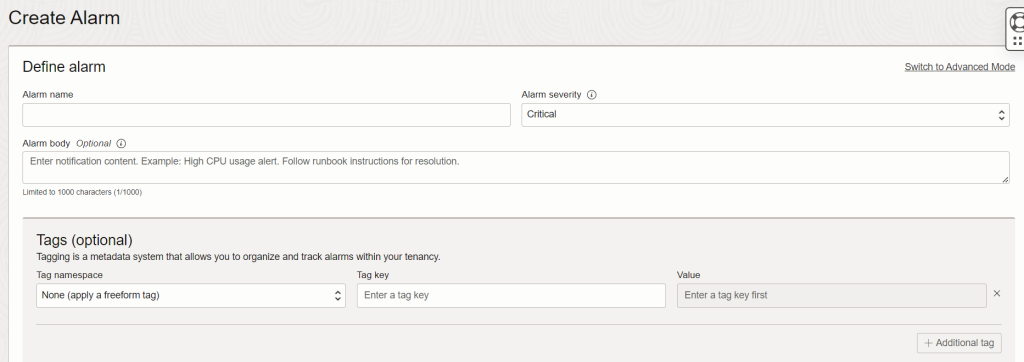
Step 2: Define Alarm Details
- Select your compartment and click on “Create Alarm”.
- Fill in details like Name, Severity, and Alarm body.

Step 3: Configure Alarm metrics.
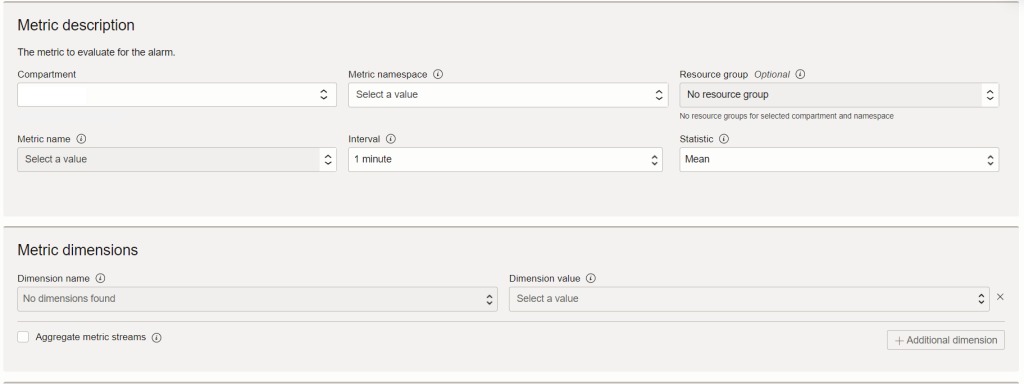
- In the Metric description fill in the required fields,
- Compartment: Choose the compartment that holds the resources responsible for generating the metrics checked by the alarm.
- Metric namespace: The Metric namespace list displays the different categories of metrics available for the chosen compartment.
- Metric name: Choose the specific metric name that you wish to assess for the alarm. You have the option to select any OCI metric or a custom metric, provided that the data is present in the chosen compartment and metric namespace.
- Interval: Pick the aggregation window, which determines how frequently data points are combined. If necessary, you can establish a custom interval to tailor the aggregation to your specific requirements.
- Statistics: Select the function to aggregate the data points like Max, Mean, Min etc.
- Within the Metric dimensions section, define optional filters to narrow down the metric data under evaluation.
- Dimension name: Choose a qualifier specified in the metric definition. For instance, the metric definition for CpuUtilization might specify the dimension resourceId.
- Dimension value: Pick the value to apply to the specified dimension. For example, if you chose resourceId as the dimension, select the resource identifier for the instance you’re monitoring.
- Additional dimension: Include another name-value pair for an additional dimension, if necessary.
- Aggregate metric streams: Check this box to obtain the combined value of all metric streams for the chosen statistic.

Step 4: Configure Trigger Rule
In the Trigger rule section, define the criteria that need to be met for the alarm to be activated. The condition can involve specifying a threshold, such as 90% for CPU utilization, or an absence of a certain metric.
- Operator: Choose the operator to apply in the condition threshold.
- Value: Input the specific value to use for the condition threshold. If using the “between” or “outside” operators, provide both values for the range.
- Trigger delay minutes: Specify the duration in minutes that the condition must persist before the alarm transitions into the firing state.

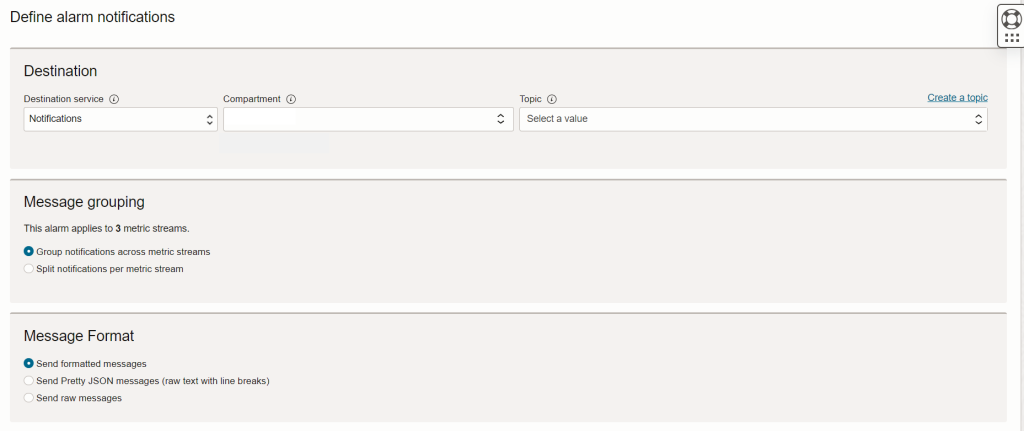
Step 5: Define alarm notifications.
- In the Destination section,
- Select Notifications as Destination service.
- The compartment is where the notification topic is created.
- Select the Topic that is created and add the subscriptions.
- In the Message grouping section,
- Select Group notifications across metric streams: Monitor metric status collectively across all streams. Receive a message when the metric status across all streams changes.
- In the Message Format section,
- Select formatted messages: It is a simplified user-friendly layout.

Step 6: Save the Alarm.
- Click the Enable Alarm check box to activate the alarm once created.
- And Click “Save Alarm” to create and establish the alarm.

Conclusion:
In conclusion, mastering OCI alarms with topic-based notifications is a strategic move for any cloud practitioner. By leveraging the integration between alarms and notification topics, you gain the ability to tailor alerting to your specific needs, ensuring that critical information is delivered to the right recipients promptly. This comprehensive approach to cloud resource monitoring not only enhances the efficiency of your operations but also contributes to the overall reliability and performance of your Oracle Cloud Infrastructure. As you navigate the intricate landscape of cloud management, harnessing the full potential of OCI alarms with topic-based notifications is a key step toward achieving a resilient and optimized cloud environment. Stay tuned for more insights and best practices on maximizing your OCI capabilities.

