Introduction: –
The Microsoft Graph API provides a powerful way to interact with a wide range of Microsoft 365 services, including Outlook, using a unified endpoint. By leveraging OAuth 2.0 authentication, developers can securely access user data, such as emails, calendar events, and contacts, on behalf of the user.
OAuth 2.0 is a modern, token-based authentication method that ensures secure access to resources without exposing user credentials. When accessing Outlook emails via the Microsoft Graph API, the process involves the following steps:
- Application Registration: Register your application in the Azure Active Directory (Azure AD) to obtain client credentials (Client ID and Client Secret).
- User Consent and Authentication: Direct the user to the Microsoft authorization endpoint to grant permission for your application to access their Outlook data. Upon successful authentication, the user is redirected back to your app with an authorization code.
- Token Exchange: Exchange the authorization code for an access token and refresh token using the OAuth 2.0 token endpoint.
- Accessing Outlook Emails: Use the obtained access token to make requests to the Microsoft Graph API, such as retrieving emails from the user’s inbox.
By using the Microsoft Graph API with OAuth 2.0, you can securely and efficiently integrate Outlook email functionality into your applications, enabling features like reading emails, sending messages, and managing user mailboxes.
Why we need to do: –
- Unified Access to Microsoft 365 Services:
- Microsoft Graph API serves as a unified endpoint to access a wide range of Microsoft 365 services, including Outlook emails, calendars, contacts, and more. This centralized approach simplifies the development process by allowing developers to use a single API to interact with various Microsoft services.
- Secure Access with OAuth 2.0:
- OAuth 2.0 is an industry-standard protocol that provides secure access to user resources without exposing their credentials. By using OAuth 2.0, applications can request specific permissions (scopes) from users, ensuring that they only access the data they are authorized to use.
- User Consent and Control:
- OAuth 2.0 ensures that users are in control of their data. When an application requests access to their Outlook emails, users must explicitly grant permission. This consent-based approach enhances trust and security, allowing users to manage what data is accessible by which applications.
- Modern Authentication Practices:
- Traditional authentication methods, like Basic Authentication (using username and password), are less secure and are being phased out by many service providers, including Microsoft. OAuth 2.0 provides a more secure, token-based authentication mechanism that reduces the risk of unauthorized access and phishing attacks.
- Granular Permission Management:
- OAuth 2.0 allows applications to request granular permissions. For example, an application can request access only to read emails without the ability to send them. This fine-grained access control enhances security and privacy, aligning with best practices in modern application development.
- Scalability and Flexibility:
- The Microsoft Graph API, combined with OAuth 2.0, offers scalability and flexibility for accessing not just emails but also a wide array of other services within the Microsoft 365 ecosystem. This enables developers to build complex, feature-rich applications that can grow and adapt as needed.
- Compliance and Governance:
- By using OAuth 2.0 and Microsoft Graph API, organizations can more easily adhere to compliance and governance policies. Microsoft 365 provides tools for monitoring and auditing API access, ensuring that data access aligns with regulatory requirements.
- Future-Proofing:
- OAuth 2.0 and the Microsoft Graph API are continually updated by Microsoft to incorporate the latest security standards and features. By adopting these technologies, developers ensure that their applications are aligned with current and future best practices.
- Integration with Other Microsoft 365 Services:
- The ability to read Outlook emails via Microsoft Graph API opens up opportunities to integrate with other Microsoft services, such as SharePoint, OneDrive, and Teams, creating seamless workflows and enhancing productivity.
How do we solve:
[Note: Steps included in this document will only works when you are using Microsoft Graph’s API]
Following steps explains in detail,
- Prerequisites for Reading Outlook Emails with Microsoft Graph API
- Client ID: This uniquely identifies your application within Azure AD.
- Tenant ID: This identifies the Azure AD directory your application is registered in.
- Client Secret: A secret key used to authenticate your application. Treat it as confidential.
- Scopes: These permissions define what data your application can access in Microsoft Graph (e.g., “https://graph.microsoft.com/Mail.Read” for reading emails).
- Code verifier: This is the secret key that generates a public code challenge.
- Code challenger: This is sent to the server while the verifier remains confidential, ensuring only the legitimate client can exchange the authorization code for tokens.
Step 2: Requesting Authorization Code:
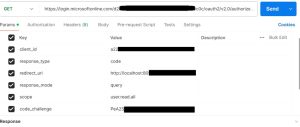
The client sends an authorization request to the authorization server, including the following parameter
| Parameter Name | Comments |
| client_id=xxxxxxxxxxxxxxx | The Application (client) ID that the Microsoft Entra admin center – App registrations experience assigned to your app. |
| response_type=code | Must include code for the authorization code flow |
| redirect_uri=http://localhost:xxxxxx | The redirect_uri of your app, where authentication responses can be sent and received by your app. It must exactly match one of the redirect URIs you registered in the portal |
| response_mode=query | Specifies how the identity platform should return the requested token to your app.
Supported values: – query: Default when requesting an access token. Provides the code as a query string parameter on your redirect URI. The query parameter isn’t supported when requesting an ID token by using the implicit flow. – fragment: Default when requesting an ID token by using the implicit flow. Also supported if requesting only a code. – form_post: Executes a POST containing the code to your redirect URI. Supported when requesting a code. |
| scope=user.read.all | A space-separated list of scopes that you want the user to consent to. For the /authorize leg of the request |
| code_challenge=xxxxxxxxxxxx
|
Used to secure authorization code grants by using Proof Key for Code Exchange (PKCE). Required if code_challenge_method is included. For more information, see the PKCE RFC. This parameter is now recommended for all application types, both public and confidential clients, and required by the Microsoft identity platform for single page apps using the authorization code flow. |
| code_challenge_method=S256 | The method used to encode the code_verifier for the code_challenge parameter. This should be S256 |
| state=12345 | A value included in the request that is also returned in the token response. It can be a string of any content that you wish |
The authorization code flow begins with the client directing the user to the /authorize endpoint.
https://login.microsoftonline.com/{tenant}/oauth2/v2.0/authorize?
Once we have all the required parameters, we need to pass them in the GET method REST API call, as shown in the image below

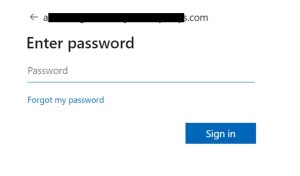
Once we click the “send” button, if the parameters are correct, the authorization server redirects the user to the login page

After successful user authentication and authorization grant, the server redirects the user back to the client’s redirect URI with an authorization code.
However, typically, we get the authorization code at the top of the webpage, as shown in the image below
![]()
Note: I am obtaining this authorization code only on the redirect URL page.
In the image above, “code” stands for the authorization code, and we have finally obtained the authorization code.
Step 3: Requesting Access token
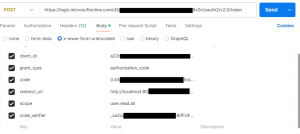
The client sends a token request to the authorization server, including the authorization code, client ID, grant type, redirect URI, scope, and a code verifier (not the code challenge).
The access token flow begins with the client directing the user to the /token endpoint.
https://login.microsoftonline.com/{tenant}/oauth2/v2.0/token?
https://login.microsoftonline.com/{tenant_id}/oauth2/v2.0/token?
client_id={client_id}&
grant_type=authorization_code&
code={authorization code}&
redirect_uri={redirect_uri}&
scope=user.read.all&
code_verifier={code verifier}
Here, to request the access token, we need to set the HTTP method to POST and the request body format to x-www-form-urlencoded in postman and include all the parameters listed below.

Upon successful token request, the response body will contain an access token and (optionally) a refresh token.
![]()
Step 4: Accessing Outlook Email:
Once we have the access token, we can access the email. To access the email, we must obtain an access token, and the URL is:
graph.microsoft.com/v1.0/me/mailFolders/inbox/messages?
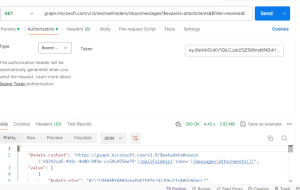
Here, we need to use the GET method to retrieve the inbox messages. Set the authorization type as Bearer token and paste the access token in the token parameters. After clicking the send button, we will receive the response with a 200-success message.

Note: In the above screenshots, I have added extra parameters such as “expand” and “filter.” Based on your requirements, you can add additional parameters as needed.
Sample Mail Response:-
{
“@odata.context”: “https://graph.microsoft.com/v1.0/$metadata#users(‘d3392cd5-492c-4d40-849a-cc54c075be79’)/mailFolders(‘inbox’)/messages”,
“value”: [
{
“@odata.etag”: “W/\”CQAAABYAAADzbaPmXTENT6/4JJQkyTtoAAQec545\””,
“id”: “AAAMkAGM2MmQ4YjNlLWIyYzYtNDFkwMS04M2M0LTc1MmNmZjM5ZDJiZQBGAAAAAADUQotcFBlgS7j_eY0avEjKBwDzbaPmXTENT6-4JJQkyTtoAAAAAAEMAADzbaPmXTENT6-4JJQkyTtoAAQiHO6GAAA=”,
“createdDateTime”: “2024-04-09T10:50:54Z”,
“lastModifiedDateTime”: “2024-04-09T10:56:11Z”,
“changeKey”: “CQAAABYAAADzbaPmXTENT6/4JJQkyTtoAAQec545”,
“categories”: [],
“receivedDateTime”: “2024-04-09T10:50:54Z”,
“sentDateTime”: “2024-04-09T10:50:18Z”,
“hasAttachments”: false,
“internetMessageId”: “<18ec27ae9a4.3ac3aee2535087.4796986959065606104xxxxxxxxxxxx.com>”,
“subject”: “Re: [Request ID :##58614##] : [External Sender] “,
“bodyPreview”: “Dear Team,\r\n\r\nWe have updated the details from our end, please check and let us know if any concerns.\r\n\r\nThanks,\r\nxxxxxxxxx”,
“importance”: “normal”,
“parentFolderId”: “AQMkAGM2MmQ4YjNlLWIyYzYtNDkwMS04M2M0LTc1MmNmZgAzOWQyYmUALgAAA9RCi1wUGWBLuP55jRq8SMoBAPNto_ZdMQ1Pr-gklCTJO2gAAAIBDAAAAA==”,
“conversationId”: “AAQkAGM2MmQ4YjNlLWIyYzYtNDkwMS04M2M0LTc1MmNmZjM5ZDJiZQAQAEseqUmd2ExNg1zJ439r284=”,
“conversationIndex”: “AQHagE0BSx6pSZ3YTE2DXMnjf2vbzrFf1tEA”,
“isDeliveryReceiptRequested”: null,
“isReadReceiptRequested”: false,
“isRead”: false,
“isDraft”: false,
“webLink”: “xxxxxxxxxxxxx”,
“inferenceClassification”: “focused”,
“body”: {
“contentType”: “html”,
“content”: “xxxxxxxxxxxxx”
},
“sender”: {
“emailAddress”: {
“name”: “xxxxxxxxxxxxxxxxxxxx”,
“address”: “xxxxxxxxxxxxxxxxxxxx”
}
},
“from”: {
“emailAddress”: {
“name”: “xxxxxxxxxxxxxxxxxxxx”,
“address”: “xxxxxxxxxxxxxxxxxxxx”
}
},
“toRecipients”: [
{
“emailAddress”: {
“name”: “xxxxxxxxxxxxx”,
“address”: “xxxxxxxxxxxxx”
}
}
],
“ccRecipients”: [
{
“emailAddress”: {
“name”: “xxxxxxxxxxxxx”,
“address”: “xxxxxxxxxxxxx”
}
},
{
“emailAddress”: {
“name”: “xxxxxxxxxxxxx”,
“address”: “xxxxxxxxxxxxx”
}
}
],
“bccRecipients”: [],
“replyTo”: [],
“flag”: {
“flagStatus”: “notFlagged”
}
},
{………},
{………}
],
“@odata.nextLink”: “https://graph.microsoft.com/v1.0/me/mailFolders(‘inbox’)/messages?%24top=10&%24skip=10”
}
When you send a GET request to retrieve inbox messages, the response from the server contains information about each email present in the inbox. This information could include details such as the sender, recipient, subject, date, attachments, and any other relevant metadata associated with each email.
By parsing and processing the response data, you can extract and display these details to the user. This allows users to view their emails directly within your application or system without needing to access their email client separately.
In summary, the statement indicates that the successful response received after sending the request contains comprehensive information about the emails in the inbox, enabling users to access and view their email details within the application or system.
Important Notes about Code Verifier and Code Challenge
Security Considerations:
The code verifier and code challenge are essential components of the OAuth 2.0 authorization process. They provide an additional layer of security by mitigating risks associated with authorization code interception attacks.
Randomness and Unpredictability:
It’s crucial to ensure that the code verifier is generated using a cryptographically secure random string generator. This randomness and unpredictability enhance the security of the authorization flow.
Code Verifier Length:
The length of the code verifier should be sufficient to withstand brute-force attacks. The recommended length is 43 to 128 characters.
Code Challenge Generation:
The code challenge is derived from the code verifier using a cryptographic hash function, typically SHA-256. It’s important to generate the code challenge securely to maintain the integrity of the authorization process.
Use of PKCE (Proof Key for Code Exchange):
The PKCE extension is recommended for public clients, such as mobile or single-page applications, to enhance security when exchanging authorization codes for access tokens. It ensures that the authorization code obtained by the attacker cannot be exchanged for an access token without the corresponding code verifier.
Lifetime and Handling:
The code verifier and code challenge should have a limited lifetime and should be securely stored during the authorization flow. Once the authorization process is completed, they should be invalidated and securely discarded.
Confidentiality:
It’s crucial to keep the code verifier confidential and not expose it in URLs or client-side code where it could be intercepted. Transmit the code verifier securely over HTTPS.
Conclusion:
Using the authorization code flow, we can securely obtain an access token, which grants permission to access protected resources on behalf of a user. With this access token, we can read the user’s email, among other authorized data, ensuring that the process is both secure and compliant with OAuth 2.0 standards.
