Introduction:
Logging is essential in any application to ensure reliability and maintainability, especially in complex systems. In an ASP.NET Core Web API, logging helps developers trace requests, identify issues, and monitor application performance. While ASP.NET Core offers built-in logging capabilities, integrating Serilog enhances this functionality by providing structured logging, customizable output formats, and extensive support for various log destinations.
This blog provides a step-by-step guide on how to integrate logging into an ASP.NET Core Web API application using Serilog.
Tools and Technologies Used:
- ASP.NET Core Web API: The framework used to build the sample application. It is a popular choice for creating RESTful services in .NET.
- Serilog: A highly flexible and powerful logging library for .NET applications, known for its structured logging capabilities.
The Need for Logging:
Logging is essential for troubleshooting, debugging, and monitoring performance. By adding logging to your application, you can quickly identify and fix problems, saving valuable time for developers.
There are many logging options available, such as the ILogger, Serilog, NLog, and more. In this blog, we’ll focus on using Serilog and explain why it’s a great choice.
Why Choose Serilog?
- Structured Logging: Serilog allows you to create well-organized logs that are easy to understand and analyze, similar to reading a detailed report.
- Flexible Sinks: With Serilog, you can send your logs to a variety of outputs, from simple console logs to advanced dashboards and databases.
- Easy Customization: Serilog lets you tailor your logging setup to fit your specific needs, making it as customizable as you want.
- Support for Multiple Formats: Serilog supports various output formats, including Plain Text, JSON, Compact JSON, XML, and even custom formats.
How do we solve:
Let’s Get Started
We’ll create a simple ASP.NET Core Web API project and configure Serilog for logging, using the default WeatherForecast controller as our example.
1. Install the Packages
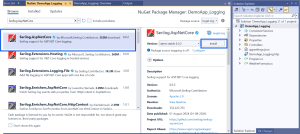
Getting started with Serilog is simple. First, install the necessary NuGet packages. Right-click on your project, select “Manage NuGet Packages,” and install the following:
- Serilog
- Serilog.AspNetCore
- Serilog.Sinks.Console (for logging to the console)
- Serilog.Sinks.File (for logging to a file)

2. Configure Serilog in appsettings.json
Serilog uses appsettings.json to define how logs are handled. Replace the default Logging{} section with the code below.
“Serilog”: {
“Using”: [“Serilog.Sinks.Console”, “Serilog.Sinks.File”],
“WriteTo”: [
{
“Name”: “Console”,
“Args”: {
“outputTemplate”: “{Timestamp:yyyy-MM-dd HH:mm:ss} [{Level}] {Message}{NewLine}{Exception}”
}
},
{
“Name”: “File”,
“Args”: {
“path”: “logs/log.txt”,
“outputTemplate”: “{Timestamp:yyyy-MM-dd HH:mm:ss} [{Level}] {Message}{NewLine}{Exception}”,
“rollingInterval”: “Day”
}
}
],
“MinimumLevel”: {
“Default”: “Information”
}
},
“AllowedHosts”: “*”
}
Let’s try to understand the code
- Serilog{} : This is the root section for all Serilog settings.
- Using : Lists the Serilog sinks you want to use (e.g., Console, File).
- WriteTo : Defines where to send logs and how to format them.
-
- Name : The type of sink (Console, File).
-
- Args : Additional settings for the sink:
-
-
- outputTemplate: The format of log messages (timestamp, level, message, etc.).
-
-
-
- path: For file sinks, the log file path.
-
-
-
- rollingInterval: How often to create new log files.
-
- MinimumLevel: Sets the lowest log level to record. Levels include:
-
- Verbose: Detailed logs for debugging and development.
-
- Debug: Information useful for diagnosing issues.
-
- Information: General operational information and events.
-
- Warning: Potential issues that are not errors but should be noted.
-
- Error: Critical problems that indicate failures.
-
- Fatal: Severe errors causing the application to terminate.
3. Integrate Serilog in Program.cs
Add Serilog to your application by updating Program.cs. Additionally, we can configure it to automatically log HTTP requests, eliminating the need to manually insert logging statements in every controller.
var builder = WebApplication.CreateBuilder(args);
// Add services to the container.
builder.Services.AddSerilog();
builder.Services.AddControllers();
builder.Services.AddEndpointsApiExplorer();
builder.Services.AddSwaggerGen();
// Configure Serilog to use settings from appsettings.json and create a logger instance
Log.Logger = new LoggerConfiguration()
.ReadFrom.Configuration(builder.Configuration)
.CreateLogger();
var app = builder.Build();
// Configure the HTTP request pipeline.
if (app.Environment.IsDevelopment())
{
app.UseSwagger();
app.UseSwaggerUI();
}
app.UseSerilogRequestLogging();
app.UseHttpsRedirection();
app.UseAuthorization();
app.MapControllers();
app.Run();
4. Test it Out!
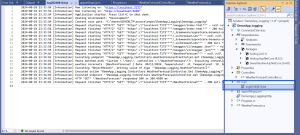
Run your application and check out the “logs” folder. You should find a file with all the logged information. Open it and see how Serilog has organized your logs in a clear, structured format!

Conclusion:
Integrating Serilog into your ASP.NET Core Web API provides powerful and flexible logging with structured output and multiple format options. By adding enrichers, you can automatically include contextual details such as machine names, thread IDs, and user information in your logs. This enhancement makes your logs more informative and useful for effective debugging and performance monitoring. Explore Serilog enrichers to further tailor your logging setup and gain deeper insights into your application’s behavior.

