Overview
Oracle APEX Interactive Grids provide a powerful way to display and manipulate tabular data. One common requirement is to display sequential numbers for each row, such as for ranking, ordering, or simply providing a unique identifier for each row in a user-friendly manner.
Technologies and Tools Used
The following technology has been used to achieve the expected output.
- JavaScript
- PL/SQL
- Oracle Apex
Use Case
Sequential numbers help in maintaining order, tracking progress, and referencing specific rows. Common use cases include task management systems, order processing, and inventory tracking.
This blog explains how we can create Sequential numbers while clicking the add row option in the interactive grid. The sequential order will also be maintained while the existing rows are deleted.
Architecture
Following steps explains in detail,
Step 1:
Create the interactive grid report and enable the edit option in the attribute.
Step 2:
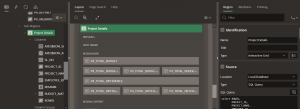
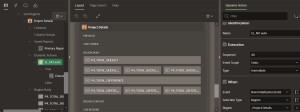
Please give static ID to the interactive grid region.

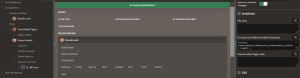
Step 3:
Create dynamic action at row initialization of that interactive grid and select the action as execute JavaScript.
Step 4:
Please use the below code in execute JavaScript.
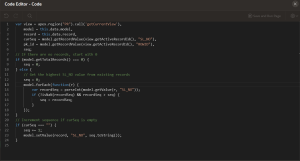
var view = apex.region(“PR”).call(‘getCurrentView’),
model = this.data.model,
record = this.data.record,
curSeq = model.getRecordValue(view.getActiveRecordId(), “SL_NO”),
pk_id = model.getRecordValue(view.getActiveRecordId(), “ROWID”),
seq;
// If there are no records, start with 0
if (model.getTotalRecords() === 0) {
seq = 0;
} else {
// Get the highest SL_NO value from existing records
seq = 0;
model.forEach(function(r) {
var recordSeq = parseInt(model.getValue(r, “SL_NO”));
if (!isNaN(recordSeq) && recordSeq > seq) {
seq = recordSeq;
}
});
}
// Increment sequence if curSeq is empty
if (curSeq === “”) {
seq += 1;
model.setValue(record, “SL_NO”, seq.toString());
}
In the above code, PR is the static ID of interactive grid region. SL_NO is sequential number column(Where we need to display the sequential number). ROWID is the primary key column of the interactive grid report.
Step 5:
Create below functions in Function and Global variable Declaration in the page property.
function remove_default_addrow_btn(p_toolbarData,p_toolbar_length) {
var i, j, container, control, done = false;
for (i = 0; i < p_toolbar_length; i++) {
container = p_toolbarData[i];
for (j = 0; j < container.controls.length; j++) {
control = container.controls[j];
if (control.action === “selection-add-row”) {
container.controls.splice(j, 1);
done = true;
break;
}
}
if (done) {
break;
}
}
}
//
function fn_resequence() {
var widget = apex.region(‘PR’).widget(),
grid = widget.interactiveGrid(‘getViews’, ‘grid’),
model = grid.model,
gn_seq = 0,
ig_seq = ”,
pk_id = ”;
model.forEach(function(r) {
if (model.allowEdit(r)) {//skip deleted row
gn_seq += 1;
ig_seq = model.getValue(r, ‘SL_NO’);
pk_id = model.getValue(r, ‘ROWID’);
model.setValue(r, ‘SL_NO’, gn_seq.toString());
}
});
}
//
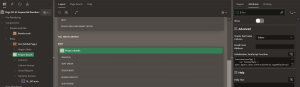
Step 6:
Add the below JavaScript function in the interactive grid at attributes Initialization JavaScript Function.
function(config) {
var toolbarData = apex.jQuery.apex.interactiveGrid.copyDefaultToolbar();
remove_default_addrow_btn(toolbarData, toolbarData.length); // Remove default add row button
var toolbarGroup = toolbarData[toolbarData.length – 3];
toolbarGroup.controls.push({
type: “BUTTON”,
action: “selection-add-row”,
label: “Add Row”,
iconBeforeLabel: true
});
config.toolbarData = toolbarData;
config.initActions = function(actions) {
actions.remove(“single-row-view”);
actions.remove(“row-duplicate”);
actions.remove(“row-add-row”);
actions.remove(“row-refresh”);
actions.remove(“row-revert”);
actions.remove(“selection-duplicate”);
actions.remove(“selection-delete”);
actions.remove(“selection-fill”);
actions.remove(“selection-clear”);
actions.remove(“selection-copy-down”);
actions.remove(“selection-copy”);
actions.remove(“selection-fill”);
actions.remove(“selection-clear”);
var rowDelete = actions.lookup(“row-delete”),
originalDeleteAction = rowDelete.action;
rowDelete.action = function(_, el) {
originalDeleteAction(_, el);
fn_resequence();
//updateTotals();
};
};
return config;
}
Conclusion
Creating sequential numbers in Oracle APEX Interactive Grids can greatly enhance data organization and user experience. By implementing a PL/SQL process or leveraging JavaScript, you can automatically generate and display sequential numbers in your grid. This not only helps in maintaining order and clarity within the data set but also simplifies tasks such as identifying records and performing bulk operations. Utilizing these methods ensures that your interactive grid remains functional, efficient, and user-friendly, thus optimizing your Oracle APEX application.
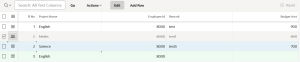
Output: