Demystifying Load Balancer Setup in Oracle Cloud Infrastructure (OCI)
Introduction
Load Balancing allows customers to distribute web requests among a group of servers or intelligently direct traffic across fault domains, availability domains, or regions. This ensures enhanced availability and fault tolerance for all applications or data sources.
The load balancer service offers a reverse proxy solution, concealing the client’s IP address from the backend application server and vice versa. It is capable of advanced layer 7 (HTTP/HTTPS) and layer 4 (TCP) load balancing, as well as SSL offloading.
Why Use Load Balancers in OCI
Load balancer in OCI can provide benefits like improved availability through health checks and automatic failover, better security with SSL termination and simplified management of network traffic. Improve performance by preventing overload on individual instances and enable seamless scaling.
ideal for: Websites, mobile apps, SSL termination, and advanced HTTP handling
Key Attributes of Load Balancer
Can load balance applications and processes (Layer 7/4) HTTP / HTTPS / TCP.
- Acts as a reverse proxy.
- Can achieve up to 8Gbps per load balancer.
- Supports backend autoscaling.
- Can terminate SSL connections.
- Can have a web application firewall.
Step-by-Step Guide: Creating a Load Balancer in Oracle Cloud Infrastructure (OCI)
- Open the Navigation menu, click Networking, and then click Load Balancers

Click Create Load Balancer provide –> Name – Test_LB
 Choose visibility type — Public IP address.
Bandwidth — Shape (10Mbps)

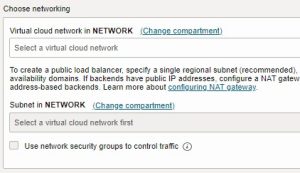
Choose networking.
Select the VCN – LB_VCN
Select the Subnet – Public Subnet
Click Next
- Create a backend set:
Specify a load balancing policy a Weighted round robin.

Click Add backends.
Change Compartment – Instance_comp — > Select — oci-test –> Port — 4443
Check Use SSL

Certificate resource — Load balancer managed certificate
Click Choose SSL certificate file and browse.
Click Show advanced options.
Go to SSL Policy
TLS (Transport Layer Security) Version –> 1.0, 1.1, 1.2
Select cipher suite –> oci-defaut-xxx.xxx. v1.
Click Next
- Create a Listener:
Protocol — HTTPS –>Port – 4443

Click Show advanced options.
Go to SSL Policy –> TLS Version à 1.0, 1.1, 1.2
Select cipher suite –> oci-default-ssl-cipher-suite-v1
Enable necessary Logs:
Enabling error and access logs is recommended for request monitoring and troubleshooting. opt for existing or new log groups for easy identification in the logging interface. Create Load Balancer.


Click Finish and Load Balancer service provisioning begins. Once provisioned, it shows as Active.
Conclusion
In conclusion, load balancing serves as a critical tool for optimizing resource allocation, fault tolerance, and ensuring uninterrupted application performance. With the added benefit of security features like Web Application Firewall (WAF), load balancers not only enhance user experience but also fortify applications against threats. Through efficient traffic management and scalability, they play a pivotal role in maintaining high availability and robust digital presence, crucial for modern organizations.
