1. Overview
This document provides a comprehensive guide on creating a plugin to refresh a report using a timer and dynamic actions. The tutorial is divided into two main sections, detailing the creation and implementation of two dynamic actions: ‘SETUP TIMER’ and ‘REFRESH REPORT’.
SETUP TIMER Dynamic Action:
- This dynamic action is triggered whenever the page item ‘Refresh every 3 seconds’ changes.
- It invokes a plugin that adds or removes a named timer, which acts on the employee region.
REFRESH REPORT Dynamic Action:
- This dynamic action is responsible for refreshing the interactive report region on the page based on the timer’s execution.
- The refresh event updates the ‘Current Timestamp’ column value, but only when the corresponding checkbox page item is checked.
Through this document, you will learn how to effectively set up and manage dynamic actions and timers to ensure your report refreshes automatically and efficiently, enhancing the interactivity and functionality of your application.
The following technologies has been used to achieve the same.
- PL/SQL
- Oracle APEX
- JavaScript
2. Why we need to do:-
Refresh Report Using Timer & Dynamic Actions:
The sales department relies on real-time inventory and sales reports to make informed decisions. The existing system requires users to manually refresh the report page to get the latest data, leading to delays and inefficiencies. A solution is needed that automatically refreshes the report at specified intervals, ensuring that users always have access to the most current data. This will ensure that we have up-to-date information without needing to manually refresh the page.
3. How do we solve:-
- Creating a Plugin:
- Click on Shared Components > Plugins > Create and provide the Plugin Name and select details as below:
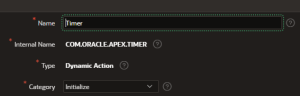
- Copy and paste the below PL/SQL code in the source and mention the Function name under Callbacks.
 PL/SQL Code
function render_timer (p_dynamic_action in apex_plugin.t_dynamic_action,p_plugin in apex_plugin.t_plugin )return apex_plugin.t_dynamic_action_render_resultisl_action varchar2(10) := nvl(p_dynamic_action.attribute_01, ‘add’);l_timer_name varchar2(20) := substr(nvl(case l_actionwhen ‘add’ then p_dynamic_action.attribute_02when ‘remove’ then p_dynamic_action.attribute_03end, p_dynamic_action.id), 1, 20);l_expire_in number := nvl(p_dynamic_action.attribute_04, 1000);l_occurrence varchar2(10) := nvl(p_dynamic_action.attribute_05, ‘infinite’);l_result apex_plugin.t_dynamic_action_render_result;beginapex_javascript.add_library (p_name => ‘com_oracle_apex_timer.min’,
p_directory => p_plugin.file_prefix,
p_version => null );
l_result.javascript_function := ‘com_oracle_apex_timer.init’;
l_result.attribute_01 := l_action;
l_result.attribute_02 := l_timer_name;
l_result.attribute_03 := l_expire_in;
l_result.attribute_04 := l_occurrence;
return l_result;
end render_timer;
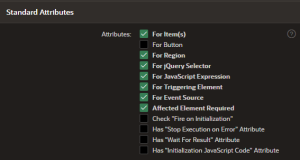
Check the below attributes under Standard Attributes and click Create Plugin.
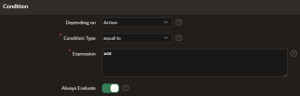
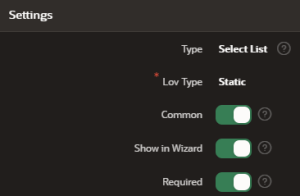
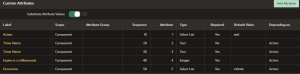
- Creating Custom Attributes:
![]()
Click on Add Attribute and create Attributes as follows:

Add a default value to the Plugin:

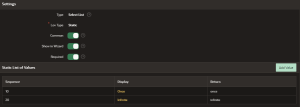
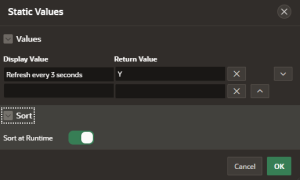
Now add Static List of values:

After creating the first attribute along with the two list of values ass and remove now we need to create other attributes as below:
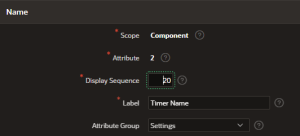
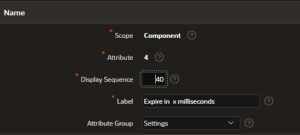
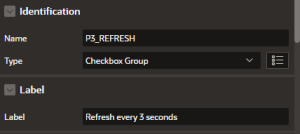
Creating 2nd Attribute:
Add a Label to the Attribute with Scope selected as Component.
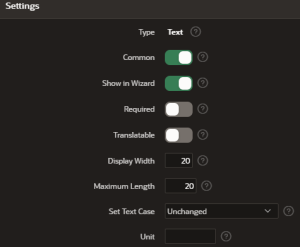
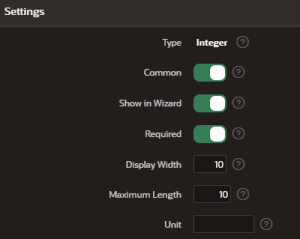
Under Settings, specify the Display width and the Maximum length and select Condition as mentioned below:

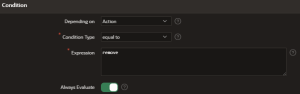
Creating 3rd Attribute:
Similarly create the 3rd attribute like the same with condition changed as below:
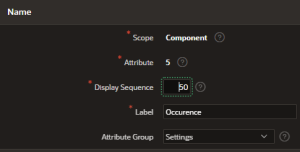
Creating the 4th Attribute:
Set the condition as below:
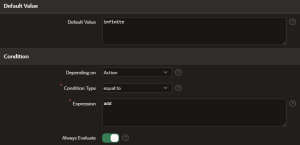
Creating the 5th Attribute:
Set default value as infinite and set condition as follows:
Below are the list of attributes created for the Plugin:
Now add an event to get displayed in the list of events in the dynamic action

Use the below JavaScript code complied as a JavaScript file and create as below:

JavaScript Code:
com_oracle_apex_timer = {
createdTimers: {},
init: function() {
var a = this.action.attribute01,
f = this.action.attribute02,
e = parseInt(this.action.attribute03, 10),
c = this.action.attribute04,
d = this.affectedElements;
function b() {
if (c === “infinite”) {
com_oracle_apex_timer.createdTimers[f] = setTimeout(b, e)
} else {
delete com_oracle_apex_timer.createdTimers[f]
}
d.trigger(“timer_expired.COM_ORACLE_APEX_TIMER”, f)
}
if (a === “add”) {
if (com_oracle_apex_timer.createdTimers[f]) {
clearTimeout(com_oracle_apex_timer.createdTimers[f])
}
com_oracle_apex_timer.createdTimers[f] = setTimeout(b, e)
} else {
if (a === “remove”) {
if (com_oracle_apex_timer.createdTimers[f]) {
clearTimeout(com_oracle_apex_timer.createdTimers[f]);
delete com_oracle_apex_timer.createdTimers[f]
}
}
}
}
};
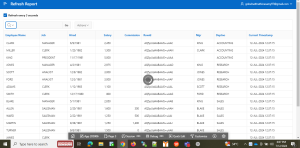
After creating the Plugin, create an APEX application with an Interactive report page.Here we have considered an Interactive report based on Emp table and set the Format mask of Current Timestamp column to DD-MON-YYYY HH24:MI:SS
Interactive report query:
SELECT e.ROWID,
e.empno,
e.ename,
e.job,
m.ename MGR,
e.hiredate,
e.sal,
e.comm,
d.dname DEPTNO,
current_timestamp
FROM emp e,
emp m,
dept d
WHERE e.mgr = m.empno (+)
AND e.deptno = d.deptno (+)
- Create a static content type Region and under Appearance, change Template as Buttons Container

- Create a Page item under this region and select type as Checkbox which displays multiple values as Check boxes enabling the end user to select multiple values.
- List of values is required for items displayed as Checkbox Group.
- Under List of values select type as Static Values and set Static values as below:
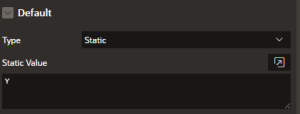
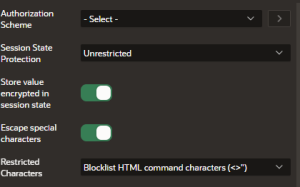
- Set default value with type as Static and set Static Value as “Y” and select Restricted Characters as below:
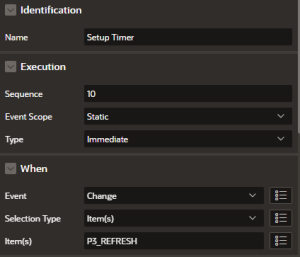
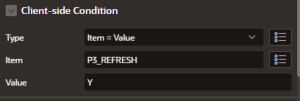
Now create a Dynamic action on change event and set the below details as follows:
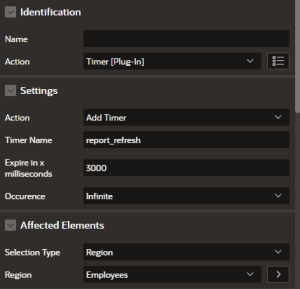
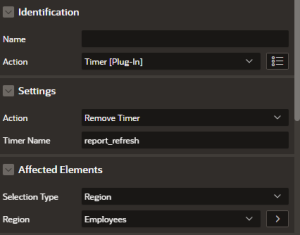
In the true action, under Action select the “Timer” plugin that we created and under Settings enter details and set “Fire on Initialization” on as below:
Create a False action in just contrary to the True action and set “Fire on Initialization” On.
Now create another Dynamic Action as “Refresh Report” and under When, select Event “Timer Expired” Timer event which we created during the Plugin creation.
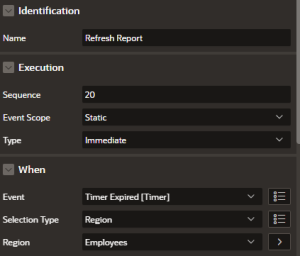
Under True Action, select Action as Refresh and select the Interactive Report as the Affected element.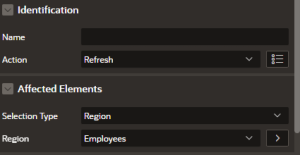
Now run the page, you can find that the Current Timestamp changes every 3 seconds indicating that the Interactive Report is refreshing every 3 seconds. If we uncheck the checkbox “Refresh every 3 seconds”, the dynamic action stops executing and the Current Timestamp column becomes Static.
4. Conclusion:-
By implementing these strategies, users can enhance the efficiency and effectiveness of data reporting, ensuring that information is always current and accurate. Mastery of these techniques not only improves user experience but also contributes to more insightful decision-making based on up-to-date information. Therefore, investing time in learning and developing such plugins can significantly benefit applications that rely heavily on real-time data presentation.