Manual-Usage:
The manual should be used along with the Fusion HCM application in order to familiarize themselves with the navigation and functionality.
1. Login to Oracle Fusion-HCM:
This section covers the basis about logging in to Oracle Fusion HCM Application. Username for all users will be communicated via email. The password will be system generated and emailed to the employee’s official email or can be requested from HR or System administrator. The link for the system is as below:
Note: Suggest all employees to save above link in your desktop or browser as a favorite.
After click on the above link, please follow the steps as suggested below
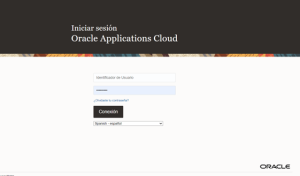
2.1 Navigate to the URL Provided above
2.2. After launching the login Home page, enter <Username>, <Password> and click on Sign button as shown below in screenshot.
Note: Consider below points as applicable while login into the application
- Username is employee’s organization (work) Employee ID.
- If you are logging in for the first time, system will ask you to reset your password. Password will be shared via email by the helpdesk or to your manager in case you do not have an official email.
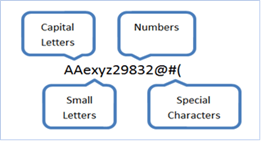
- Password must contain at least one Capital letter, one Small letter, one Number and one Special character.
Please refer below pictorial diagram for more understanding
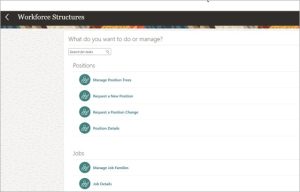
2. Workforce Structure:
Through this, HR Administrator and/or any relevant role which has access to admin activities can review and revise the initial setup done during implementation and if there are changes in AGS enterprise structure.
As a part of this activity, HR/Admins can add or revise workforce structures. For example, add new departments, create new jobs, or revise rates for grades (if applicable).
HR add and edit workforce structures using the Workforce Structures work area. Such as
- Departments
- Locations
- Jobs
- Grades etc.,
3.1. Manage Department:
A department is an organization with one or more operational objectives or responsibilities that exist independently of its manager. For example, although the manager may change, the objectives don’t change. Departments have one or more workers assigned to them.
A manager of a department is typically responsible for:
- Controlling costs within their budget
- Tracking assets used by their department
- Managing employees, their assignments, and compensation
Oracle Fusion Human Capital Management (HCM) assigns workers to departments and tracks the headcount at the departmental level.
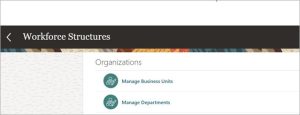
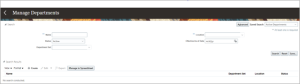
Navigation: Springboard > My Client Group > Workforce Structure > Organization > Manage Department
Step-1: select ‘My Client Group’ tab from springboard and click on Workforce structure.
Step-2: Click on ‘Manage Department’ activity under ‘Organization’ header as shown below.
Step-3: Click on + button to Create a ‘New Department’.
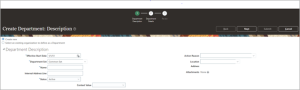
Step-4: Enter all required details under ‘Department Description’ header, click Next.
- Effective start date of the New Department
- Applicable Department data set
- Name of the department
- Other details such as department location, reason etc.,
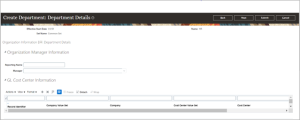
Step-5: Enter Department Manager and other required details.
Step-6: Review the details entered and then submit.
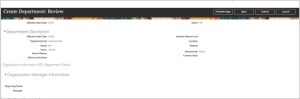
Note: Upon submit, if there is no auto approval, then system should route this request based on standard system approval or AGS approval policy.
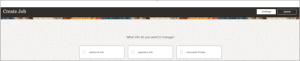
3.2. Manage Job:
Jobs represent roles that enable you to distinguish between tasks and the individuals who perform those tasks. The key to using jobs depends on how each is used.
A job can be defined globally in the Common Set, whereas a position is defined within one business unit.
HR can update the job and department of a person at any time. For example, if you hire someone into a new role and want to transfer the person to another Job/department.
Step-1: Repeat Step-1 mentioned in 3.1. section.
Step-2: Click on ‘Job Details’ activity under ‘Jobs’ header as shown below.
Step-3: click on + Add button to add New Job in the system.

Step-4: Click Continue to create a Job
Step-5: Enter the date when Job starts and Click Continue
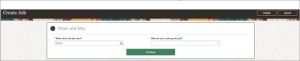
Step-6: Enter all required basic details like Name, Code and click on ‘Submit’

Note: Upon submit, if there is no auto approval, then system should route this request based on standard system approval or AGS approval policy.
Step-7: After submitting the job, we can go and see the whether the Job is created. Repeat Step-1 mentioned in 3.1. section and Click on ‘Job Details’ activity under ‘Jobs’ header as shown below.

Step-8: Search for the Job

Step-9: Here is the Job which we have created.