Introduction
Sending emails that contain actionable links directly into an Oracle APEX application is a powerful way to engage users. Whether it’s for tracking email responses, providing quick access to reports, or guiding users through specific workflows, embedding hyperlinks or buttons in emails enhances the user experience and streamlines communication.
The following technology are involved to done this.
- Oracle APEX
- PLSQL
Why we need to do
In many scenarios, you might need to send emails from your Oracle APEX application that include links back to specific pages or reports within the app. This could be for purposes such as:
- Tracking Responses: Allowing users to click a link to confirm receipt or review their data.
- Providing Easy Access: Enabling users to quickly navigate to a particular section of the application without manually searching for it.
- Personalization: Offering personalized content or reports based on user actions.
How do we solve
In this guide, we’ll walk you through the process of creating a demo application in Oracle APEX that can send emails with embedded hyperlinks or buttons. These links will direct recipients to specific pages within the APEX application, allowing for personalized and actionable email communications.
1. Creating a New Application
Step 1.1: Start by Creating the Application
- Open Oracle APEX and navigate to the App Builder.
- Click on Create to start building a new application.
- In the wizard that appears, give your application a meaningful name, such as “Email Demo”.
- Choose the default settings for the application. Oracle APEX will generate a basic application structure for you.
Step 1.2: Review the Generated Application
- Once the application is created, you’ll see a default home page with no regions added.
- This page is essentially a blank canvas where you’ll add regions, components, and processes.
This step establishes the foundation of your demo application, preparing it for further customization.
2. Adding Page Items and a Button
Step 2.1: Add a Static Content Region
- Go to the home page of your newly created application.
- In the Page Designer, select the Content Body
- Click on Create and select Static Content from the region options.
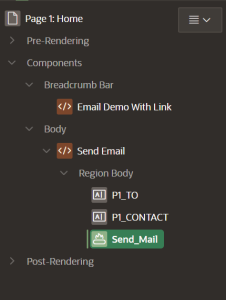
- Name this region “Send Email”. This region will serve as the main area where the user inputs email details and sends the email.

Step 2.2: Add Input Fields for Email Details
- Inside the “Send Email” region, add two page items:
- P1_TO: A Text Field item where the user will input the recipient’s email address.
- P1_CONTACT: Another Text Field item for the recipient’s name.
These fields will capture the necessary details to personalize and send the email.
Step 2.3: Add a Send Button
- Still in the same region, add a button that users will click to send the email.
- Set the button’s Type to “Text and Icon (Hot)”.
- Name the button “SEND”, and choose an appropriate icon, like “fa-send”.
- Set the label of the button to “Send email”.
This button will trigger the email-sending process when clicked.
3. Building a PL/SQL Process
Step 3.1: Create a New Process to Send the Email
- In the Page Designer, switch to the Processes
- Click on Create and select Process.
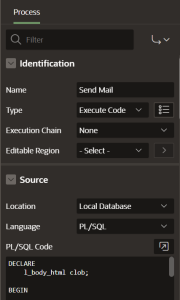
- Name this process “Send mail” and set the type to “Execute Code”.
Step 3.2: Write the PL/SQL Code
- In the process settings, enter the following PL/SQL code in the Sourcesection:
Code:
DECLARE
l_body_html clob;
l_body clob;
BEGIN
l_body := ‘Hello ‘|| :P1_CONTACT || ‘,’||UTL_TCP.crlf;
l_body := l_body || ‘This is an email sent from Oracle APEX.’||UTL_TCP.crlf;
l_body := l_body || ‘Please click the following link to view your email log.’||UTL_TCP.crlf;
l_body := l_body || apex_mail.get_instance_url || APEX_UTIL.PREPARE_URL(‘f?p=&APP_ID.:81:::::P81_MAIL:&P80_TO.’) ||UTL_TCP.crlf;
l_body := l_body || ‘Best Regards’;
l_body_html := ‘<p>Hello ‘|| :P1_CONTACT || ‘,</p>’
|| ‘This is an email sent from <strong>Oracle APEX</strong>.<br />’
|| ‘Please click the button to view your email log.<br />’
|| ‘<table border=”0″ cellspacing=”0″ cellpadding=”0″>’
|| ‘ <tr>’
|| ‘ <td> </td>’
|| ‘ </tr>’
|| ‘ <tr>’
|| ‘ <td style=”padding: 12px 18px 12px 18px; border-radius:10px; background-color: #056ac8;” align=”center”>’
|| ‘ <a href=”‘ || apex_mail.get_instance_url || apex_page.get_url(p_page => 2, p_items => ‘P2_MAIL’,p_values => :P1_TO) || ‘” target=”_blank” style=”font-size: 15px; font-family: Helvetica, Arial, sans-serif; font-weight: bold; color: #ffffff; text-decoration: none; display: inline-block;”>Click here</a>’
|| ‘ </td> ‘
|| ‘ </tr>’
|| ‘ <tr>’
|| ‘ <td> </td>’
|| ‘ </tr>’
|| ‘</table>’
|| ‘Best Regards’;
apex_mail.send(
p_to => :P1_TO,
p_from => :APP_EMAIL,
p_body => l_body,
p_body_html => l_body_html,
p_subj => ‘Including a link in an email to an APEX App’
);
apex_mail.push_queue;
END;
Step 3.3: Set Process Execution Conditions
- Define when this process should run:
- Success Message: Set to “Email sent”.
- Error Message: Set to “Email failed to send!”.
- When Button Pressed: Choose the “SEND” button.
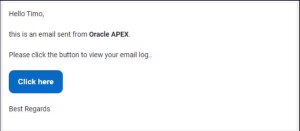
This PL/SQL process constructs the email content, including a dynamic link that takes the user to the desired APEX page, and then sends the email.
4. Creating a Mail Log Page
Step 4.1: Create a New Page for Viewing Email Logs
- In the APEX Builder, create a new page by clicking on Create Page.
- Choose Reportas the page type and then select Interactive Report.
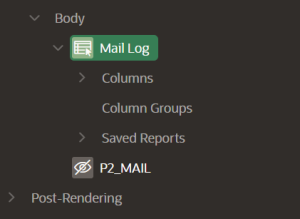
- Set the page number to “2” and name the page “Mail Log”.
- Disable navigation entry creation as it’s not needed for this demo.
Step 4.2: Define the Data Source for the Report
- Change the source type to SQL Query.
- Use the following SQL query to retrieve email log data filtered by the recipient’s email:
Code:
SELECT *
FROM apex_mail_log
WHERE mail_to = :P2_MAIL
ORDER BY last_updated_on DESC;
Step 4.3: Create a Hidden Page Item for Filtering
- Add a hidden page item named P2_MAILto the new page.
- This item will capture the email address passed in the URL and filter the report accordingly.
Step 4.4: Enable Deep Linking
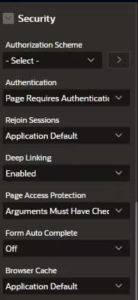
- Ensure that Deep Linkingis enabled in the application’s settings.
- Deep Linking allows users to access the page directly via the URL, even if they don’t have an active session, making the email link functional for all recipients.
This final step allows you to display a filtered view of email logs based on the email address passed through the hyperlink in the email.
Conclusion
With these steps, you’ve created a fully functional Oracle APEX application capable of sending emails with dynamic links that redirect recipients to specific pages. This method enhances communication by making email interactions more direct and actionable, leading to a better user experience.

![]()
