Overview
Interactive Grid (IG) allows a great deal of customization to its toolbar and menus. The toolbar is implemented by a new toolbar widget. Like most widgets, the toolbar is configured with an options object given to it when it is created.
A toolbar contains an array of control groups and each control group contains an array of controls. Controls can be buttons, toggle buttons, menus, radio groups, select lists, text fields, or static text.
Here we are going to see about adding buttons in the Interactive Grid.
Technologies and Tools Used
The following technology has been used to achieve the expected output.
Ø JavaScript
Use Case
In oracle apex, the Interactive Grid toolbar will have the default buttons for Save, Update and delete. We are going to add the customized button to the Interactive Grid toolbar for approval. Approve will update the data in the interactive grid based on the business requirement or condition.
Button approve is not available in the Interactive Grid toolbar. The below will show how to add a toolbar button at the very end that runs your own action. The action is very simple. It just going to click the button you have created with static ID in oracle apex. Add the code to the IG Advanced JavaScript Code attribute.
![]()
This document explains how to achieve this requirement.
Architecture
The following steps explain in detail,
Step 1:
We need to create the button with static Id.
![]()
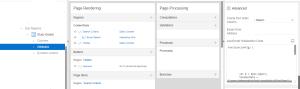
Step 2:
In the Interactive Grid reports attributes, we have option advance. In advance, We need to add the below JavaScript code in JavaScript initialization code.
function(config) {
var $ = apex.jQuery,
toolbarData = $.apex.interactiveGrid.copyDefaultToolbar(),
lastToolbarGroup = toolbarData.toolbarFind(“actions4”),
createButton = {
type: “BUTTON”,
hot: true,
action: “approve_test”
};
lastToolbarGroup.controls.push( createButton );
config.toolbarData = toolbarData;
config.initActions = function(actions) {
actions.add({
name: “approve_test”,
label: “Approve”,
action: $(“#hiddenApprove”).prop(“onclick”)
}); }
}
ScreenShot
Output:
By using the above steps we can add a toolbar button at the very end that runs your own action.
![]()