1.Introduction
Hugging Face provides a repository of numerous pretrained models for various use cases, which are open source. It functions similarly to GitHub, allowing users to access and use these models without needing to train them from scratch. You can directly use these models for tasks like text classification, translation, summarization, and more.
This makes it much easier and faster to deploy machine learning and AI solutions. In this blog, we will explore how to load and use Hugging Face pretrained models with a simple implementation for customer review classification.
2.Why We Need This Solution?
When developing an AI or ML solution that requires a large language model (LLM), it must be trained on a huge dataset. However, training a model from scratch is expensive and time-consuming. Pretrained models are AI models that have already been trained on vast amounts of generic data from the internet.
Examples of pretrained models include BERT, LLaMA, GPT, and T5. These models provide a strong base understanding of language and can be directly used for many NLP tasks.
If we need an AI or ML solution for a specific use case, instead of training a model from scratch, it’s better to fine-tune a pretrained model with our custom dataset. This process helps the model specialize in the required domain while leveraging the knowledge it has already learned.
Example Analogy:
Hugging Face is like an online recipe platform, where chefs (developers) share and access AI models.
- A pretrained model is like a pre-made dough—it saves time instead of starting from raw ingredients.
- Just like adding custom toppings to a pizza base, we fine-tune pretrained models with custom data to fit specific needs.
3.How Do We Solve This?
- Filter by Category – Use the left panel to select the type of model you need. For this blog, we’ll use a Hugging Face model for customer review classification (positive/negative sentiment), which falls under Text Classification. The right panel will display all available models for this task. Visit Hugging Face – Navigate to the Hugging Face website and click on the Models tab.
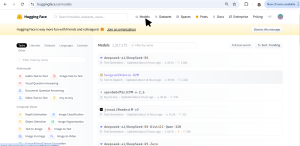
- Explore Available Models – The page lists various models, categorized by their use cases (e.g., text classification, image generation, speech recognition).
- Filter by Category – Use the left panel to select the type of model you need. For this blog, we’ll use a Hugging Face model for customer review classification (positive/negative sentiment), which falls under Text Classification. The right panel will display all available models for this task.
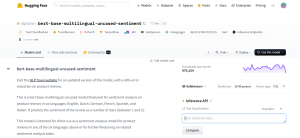
 4.Choose a Suitable Model – Review the model details and Model Card to understand how to use it, what dataset it was trained on, What framework it was built with (e.g., TensorFlow, PyTorch), Performance metrics.
Implementing the Pretrained Model
Now that we have selected a Hugging Face model for customer review classification, let’s integrate it into our project.
For this customer review classification task, we are going to use the nlptown/bert-base-multilingual-uncased-sentiment model from Hugging Face. This is a sentiment analysis model trained to classify text into five sentiment categories.
Step 1: Install Required Libraries
Ensure you have the necessary libraries installed. The required dependencies vary based on the model you choose. Check the model’s documentation or Hugging Face’s model card for specific requirements.
For example, for this customer reviews classification we are using a PyTorch-based model so we must install:
The transformers library by Hugging Face provides APIs to easily load, fine-tune, and use pretrained models for various NLP and AI tasks.
Step 2: Load the Model and Tokenizer
A model is a trained neural network that makes predictions based on input data, while a tokenizer converts raw text into numerical tokens that the model can understand.
import streamlit as st import torch
from transformers import AutoTokenizer, AutoModelForSequenceClassification
model_name = “nlptown/bert-base-multilingual-uncased-sentiment”
# Load tokenizer and model
tokenizer = AutoTokenizer.from_pretrained(model_name)
model = AutoModelForSequenceClassification.from_pretrained(model_name)
For different modal change the modal_name accordingly.
Step 3: Define a Function for Inference
Since we’re using a text classification model, our function should process input text and return sentiment predictions.
This function tokenizes the input text, feeds it into the model, and predicts the sentiment class and maps the model’s output to human-readable sentiment labels.
#Function to classify sentiment of a review text def classify_sentiment(text):
# Tokenize input text
inputs = tokenizer(text, return_tensors=”pt”, truncation=True, padding=True, max_length=512)
# Perform inference with the model
with torch.no_grad():
outputs = model(**inputs)
# Get the predicted sentiment (0-4 stars)
logits = outputs.logits
predicted_class = torch.argmax(logits, dim=-1).item()
sentiment = [“Extremely Dissatisfied”, “Dissatisfied”, “Neutral”, “Satisfied”, “Extremely Satisfied”]
# Return the sentiment label and its confidence score
confidence = torch.nn.functional.softmax(logits, dim=-1)[0][predicted_class].item()
return sentiment[predicted_class], confidence
Step 4: Build a Simple User Interface with Streamlit
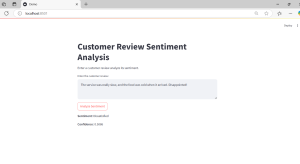
To make the model accessible to users, we can create an interactive web application using Streamlit.
st.title(“Customer Review Sentiment Analysis”) st.write(“Enter a customer review analyze its sentiment.”)
# Input text for sentiment analysis
review_text = st.text_area(“Enter the customer review:”, “”)
# Analyze sentiment when the button is pressed
if st.button(“Analyze Sentiment”):
if review_text.strip():
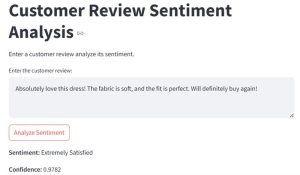
sentiment, confidence = classify_sentiment(review_text)
st.write(f”**Sentiment:** {sentiment}”)
st.write(f”**Confidence:** {confidence:.4f}”)
else:
st.warning(“Please enter a review before submitting.”)
Step 5: Run and Deploy
To test the application locally, run:
Now check the UI in the mentioned url by streamlit and test the modal. While running it for the first time it’ll take take to load.
4.Conclusion
This is how we can leverage Hugging Face pretrained models to quickly build AI applications without training from scratch. By selecting the right model, loading it, and integrating it into our project, we can perform various NLP tasks efficiently.
Furthermore, if needed, we can fine-tune the model with a custom dataset to improve its performance for specific use cases. Fine-tuning allows the model to better understand domain-specific language while leveraging the knowledge it has already learned.