Introduction:
Effective email communication is essential for modern applications, whether for sending notifications, alerts, or user-generated messages. In this blog, we’ll explore how to build a reusable email-sending API using Google SMTP in .NET 8. This API allows you to send emails programmatically by leveraging Google’s SMTP server, making it a versatile solution for integrating email functionality into your applications.
Technologies and Tools Used:
The following technologies have been used to achieve the same.
- .NET 8: The latest .NET framework, offering modern features and enhanced performance for web applications and APIs.
- ASP.NET Core: A high-performance, cross-platform framework for building scalable web APIs.
- Google SMTP Server: Google’s email server for sending emails, requiring authentication and secure connections.
- System.Net.Mail: A .NET library for handling email operations via SMTP.
The Need for this API:
This API provides a service for sending custom, on-demand emails by allowing applications to submit requests with specific email details such as from, to, body, and subject. It is well-suited for scenarios where applications need to send user-generated emails, notifications, or alerts in real-time based on user actions or requests.
How do we solve:
Steps to Build Your Email-Sending API:
1. Create a New Project
- Open Visual Studio (or your preferred IDE).
- Create a New Project:
- Select ASP.NET Core Web API.
- Choose .NET 8.0 as the target framework.
- Click on Create.
2. Add Required Dependencies
To handle email functionalities, you need to add System.Net.Mail to your project:
Open NuGet Package Manager:
- Go to Tools > NuGet Package Manager > Manage NuGet Packages for Solution.
- Search for System.Net.Mail and install it.
3. Define the Email Request Model
Create a class to represent the structure of your email request:
{
public string From { get; set; }
public IEnumerable<string> To { get; set; }
public string Subject { get; set; }
public string Body { get; set; }
public string SmtpServer { get; set; }
public int Port { get; set; }
public string Username { get; set; }
public string Password { get; set; }
}
This model captures all the necessary details for sending an email, including sender and recipient addresses, subject, body, SMTP server details, and authentication credentials.
4. Implement the Email Service
The EmailService class is responsible for the actual email-sending logic. It communicates with the SMTP server and handles the creation and sending of email
using System.Net.Mail;
using System.Threading.Tasks;public class EmailService : IEmailService
{
public async Task SendEmailAsync(EmailRequest emailRequest)
{
try
{
var smtpClient = new SmtpClient(emailRequest.SmtpServer)
{
Port = emailRequest.Port,
Credentials = new NetworkCredential(emailRequest.Username, emailRequest.Password),
EnableSsl = true
}; var mailMessage = new MailMessage
{
From = new MailAddress(emailRequest.From),
Subject = emailRequest.Subject,
Body = emailRequest.Body,
IsBodyHtml = true
}; foreach (var recipient in emailRequest.To)
{
mailMessage.To.Add(recipient);
} await smtpClient.SendMailAsync(mailMessage);
}
catch (SmtpException smtpEx)
{
throw new InvalidOperationException(“SMTP error occurred”, smtpEx);
}
catch (Exception ex)
{
throw new InvalidOperationException(“Failed to send email”, ex);
}
}
}
The EmailService is responsible for the core logic of sending emails. It:
- Establishes a connection: Configures an SMTP client with the specified server details, credentials, and security settings.
- Crafts the message: Builds an email message based on the provided details, including sender, recipients, subject, and body content.
- Delivers the email: Asynchronously sends the constructed email message through the SMTP server.
- Handles potential issues: Implements robust error handling to gracefully manage unexpected SMTP or general exceptions.
5. Create the Email Controller
The EmailSenderController handles HTTP requests related to sending emails. It receives email requests, interacts with the EmailService, and returns appropriate responses.
[Route(“api/[controller]”)]
public class EmailSenderController : ControllerBase
{
private readonly IEmailService _emailService; public EmailSenderController(IEmailService emailService)
{
_emailService = emailService;
} [HttpPost(“send”)]
public async Task<IActionResult> SendEmail([FromBody] EmailRequest request)
{
if (request == null)
{
return BadRequest(“Invalid email request.”);
} try
{
await _emailService.SendEmailAsync(request);
return Ok(“Email sent successfully.”);
}
catch (Exception ex)
{
return StatusCode(500, $”Internal server error: {ex.Message}”);
}
}
}
The EmailSenderController serves as the public interface for sending emails. It:
- Receives email requests: Accepts incoming HTTP POST requests containing email details.
- Orchestrates email delivery: Passes the received email request to the IEmailService for processing and sending.
- Provides feedback: Returns appropriate HTTP responses to indicate the success or failure of the email sending operation.
6. Configure Dependency Injection
Update your Program.cs to register services and configure the middleware:
using EmailHub;var builder = WebApplication.CreateBuilder(args);
// Add services to the container.
builder.Services.AddControllers();
builder.Services.AddEndpointsApiExplorer();
builder.Services.AddSwaggerGen();
// Register your custom services
builder.Services.AddScoped<IEmailService, EmailService>();
var app = builder.Build();
// Configure the HTTP request pipeline.
if (app.Environment.IsDevelopment())
{
app.UseSwagger();
app.UseSwaggerUI();
}
app.UseHttpsRedirection();
app.UseAuthorization();
app.MapControllers();
app.Run()
7. Run and Test Your API
- Build and run your application.
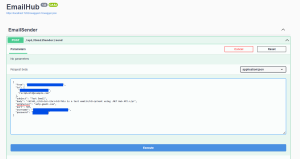
- Test the API using tools like Postman and swagger. Send a POST request with the appropriate JSON body.
Example Request Body
Here’s how your request body should look:
“from”: “your-email@gmail.com“,
“to”: [“recipient@example.com“],
“subject”: “Test Email”,
“body”: “<h1>This is a test email</h1>”,
“smtpServer”: “smtp.gmail.com”,
“port”: 587,
“username”: “your-email@gmail.com“,
“password”: “your-password”
}

If you encounter authentication issues and have two-step verification enabled, try using an app-specific password.
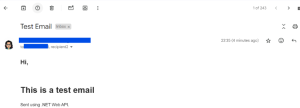
Once you receive a successful response, check your email to confirm delivery.

Conclusion:
By following this guide, you’ve built a reusable email-sending API using Google SMTP in .NET 8. This API can now be easily integrated into various applications, providing robust email functionality with minimal configuration.
