
Upgrade Oracle Container Database from 19c to 26AI using AUTOUPGRADE Utility.

Introduction:
Keeping Oracle databases on supported releases is essential for security, performance, and access to new features. Oracle AI Database 26ai introduces several enhancements over Oracle Database 19c, making it a recommended upgrade target. While manual upgrades involve multiple validation and configuration steps, Oracle’s Auto Upgrade Utility simplifies the process by automating prechecks, fixups, upgrade execution, and post-upgrade tasks. In this blog, we’ll walk through upgrading an Oracle 19c Container Database (CDB) to Oracle AI Database 26ai using Auto Upgrade.
Why Do We Need It?
Manual database upgrades are time-consuming and prone to errors due to numerous prerequisite checks, parameter validations, component verification, and post-upgrade activities. In Container Databases, managing multiple PDBs adds further complexity. Oracle Auto Upgrade minimizes these challenges by automating validations, identifying issues, applying fix ups where possible, and providing detailed reports, making the upgrade process more reliable and efficient.
How Do We Solve It?
The solution is to use Oracle’s Auto Upgrade Utility. First, verify the database is eligible for upgrade and take a full RMAN backup. Install the Oracle 26ai software, configure Auto Upgrade, and run Analyze mode to identify and resolve any issues. Once all prechecks pass, execute Deploy mode to perform the upgrade. Finally, validate the upgraded database and complete the post-upgrade checks.
High-Level Upgrade Steps:
- Verify that the 19c database is eligible for direct upgrade to 26ai.
- Perform a full RMAN backup and ensure recovery options are available.
- Install Oracle AI Database 26ai software in a new Oracle Home and apply the latest Release Update (RU).
- Download the latest Auto Upgradeutility and place it in the target Oracle Home.
- Create the AutoUpgrade configuration (config.cfg).
- Execute AutoUpgrade in Analyze mode.
- Review and fix all reported pre-upgrade issues.
- Execute AutoUpgrade in Deploy mode.
- Monitor the upgrade and resume automatically if required.
- Perform post-upgrade validation, run datapatch (if required), recompile invalid objects.
In Simple,
- Install the 26ai Oracle Home.
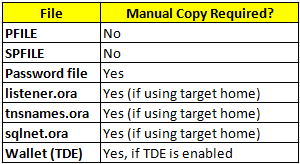
- Copy the password file to the 26ai dbs
- Copy the network configuration files (or configure TNS ADMIN).
- Copy the TDE wallet if encryption is enabled.
- Run AutoUpgrade in Deploy mode.
- Let Auto Upgradecreate and manage the SPFILE in the target Oracle Home automatically.
Prerequisite:
- 26AI database home with latest auto upgrade utility.
- Make sure Java_Pool is greater than 400M
- Source Database should be compatiblefor upgrade.
- Required Free Space and CPU to perform the upgrade.
- Latest AutoUpgrade Utility —https://download.oracle.com/otn-pub/otn_software/autoupgrade.jar
- Also, Make sure to move the respective files from 19c to 26AI as mentioned below,
Auto Upgrade Flow:

Steps to perform Upgrade:
Step 1: Verify Database Eligibility (Perform in CDB and PDB Level)
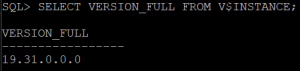
a) Check DB version (should return 19c)
SELECT * FROM v$version;
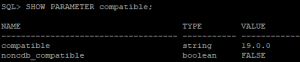
b) Check Compatible Parameter (should return 19.0.0),
SHOW PARAMETER COMPATIBLE;
c) Verify invalid objects,
SELECT owner, COUNT(*) FROM dba_objects WHERE status=’INVALID’ GROUP BY owner ORDER BY owner;
d) Check Component Status,
SELECT comp_name, version, status FROM dba_registry ORDER BY comp_name;

Step 2: Perform RMAN Backup,
a) Backup entire database,
BACKUP DATABASE PLUS ARCHIVELOG;
b) Backup SPFILE,
BACKUP SPFILE;
c) Backup Control File,
BACKUP CURRENT CONTROLFILE;
Step 3: Install Oracle 26AI Database Software
a) Create new Oracle Home,
mkdir -p /u01/apps/oracle/product/26ai/home

b) Move the 26AI home zip file and extract the file.
c) Then, Install the 26AI software only.
Step 4: Download latest AutoUpgrade Utility
Download latest autoupgrade.jar from Oracle Support (MOS Note 2485457.1).
By default, Inside $ORACLE_HOME/rdbms/admin, we have auto upgrade utility.
Check the version,
java -jar autoupgrade.jar -version


Step 5: Create AutoUpgrade Configuration,
a) Create a sample .cfg file to configure autoupgrade,
/u01/apps/oracle/product/19c/home/jdk/bin/java \
-jar /u01/apps/oracle/product/19c/home/rdbms/admin/autoupgrade.jar \
-create_sample_file config

b) Created a config file called upgrade.cfg to perform the upgrade,
global.autoupg_log_dir=/home/oracle/upgrade
upg1.start_time=NOW
upg1.source_home=/u01/apps/oracle/product/19c/home
upg1.target_home=/u01/apps/oracle/product/26ai/home
upg1.sid=TEST
upg1.log_dir=/home/oracle/upgrade
upg1.target_version=26
upg1.run_utlrp=yes
upg1.timezone_upg=yes
Modified the values like mentioned above and also, I have created a directory called upgrade to store the upgrade logs.
Step 6: Run Analyze Mode
a) Make sure database, listener is up and running.
/u01/apps/oracle/product/26ai/home/jdk/bin/java -jar /u01/apps/oracle/product/26ai/home/rdbms/admin/autoupgrade.jar \
-config /home/oracle/upgrade.cfg \
-mode analyze

Monitor the process by checking the log file which is located in the directory mentioned in the .cfg file.
b) Navigate to log directory which has SID name as directory inside that we can find the numerical directory which is a job number created by the auto upgrade.
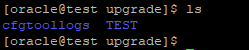

c) Inside the job directory(100) we can find the multiple logfiles,

autoupgrade_20260717.log ← Main AutoUpgrade log
autoupgrade_20260717_user.log ← User-friendly summary
autoupgrade_err.log ← Errors (if any)
prechecks/ ← Pre-upgrade reports and fixups
d) Check the autoupgrade_err.log file to find any errors.

Since, the database I am testing is in no archive mode and so the error is! Also, we can navigate to the .html file and view the error.
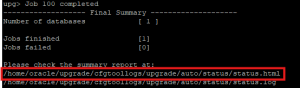

e) Rerun the analyze mode and check for the errors. Meanwhile, we can monitor the job status in an interactive way,
To list running jobs — lsj
To check the status of a particular jobs — status -job <number>


The log says the status is success!
f) Inspect the prechecks directory, because that’s where AutoUpgrade stores the analysis report.


Use the html file to fix analyze findings.
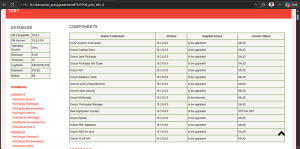
On the left hand side, we can get the error and warning details.
We have a ignorable error, so we are moving to autoupgrade deploy mode.
What is happening during Analyze?
- Start Analyze Mode
- Read AutoUpgrade Configuration
- Validate Source & Target Oracle Homes
- Connect to the Database
- Collect Database Information
- Run Prefixups(Identify automatic & manual fixups)
- Run DBDrain Assessment(Check services, sessions, RAC/Data Guard readiness)
- Run Pre-Upgrade Checks(Components, parameters, tablespaces, FRA, timezone, JVM, etc.)
- Identify Errors, Warnings & Recommendations
- Generate Fixup Scripts and HTML Reports
- Analyze Completed
Step 8: Execute AutoUpgrade in Deploy Mode,
a) Verify the target Oracle Home
export ORACLE_HOME=/u01/apps/oracle/product/26ai/home
export PATH=$ORACLE_HOME/bin:$PATH
b) Start the upgrade deployment,
/u01/apps/oracle/product/26ai/home/jdk/bin/java -jar /u01/apps/oracle/product/26ai/home/rdbms/admin/autoupgrade.jar \
-config /home/oracle/upgrade.cfg \
-mode deploy
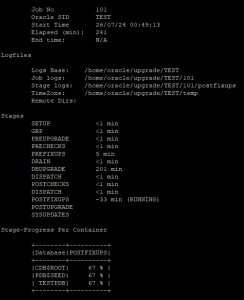
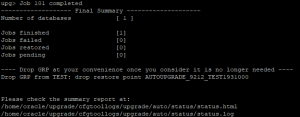
Autoupgrade completed successfully!
We can drop the restore point in the 26AI once we are done with the upgrade!

Auto Upgrade Utility Commands,
# Create a sample AutoUpgrade configuration file
java -jar $ORACLE_HOME/rdbms/admin/autoupgrade.jar -create_sample_file config
# Display AutoUpgrade utility version
java -jar $ORACLE_HOME/rdbms/admin/autoupgrade.jar -version
# Display AutoUpgrade help
java -jar $ORACLE_HOME/rdbms/admin/autoupgrade.jar -help
# Run Analyze mode (read-only pre-upgrade checks)
java -jar $ORACLE_HOME/rdbms/admin/autoupgrade.jar -config /home/oracle/upgrade.cfg -mode analyze
# Run Fixups mode (execute automatic pre-upgrade fixups)
java -jar $ORACLE_HOME/rdbms/admin/autoupgrade.jar -config /home/oracle/upgrade.cfg -mode fixups
# Run Deploy mode (perform the actual database upgrade)
java -jar $ORACLE_HOME/rdbms/admin/autoupgrade.jar -config /home/oracle/upgrade.cfg -mode deploy
Interactive console Commands,

Conclusion:
Oracle AutoUpgrade provides a simple, automated, and reliable approach to upgrading Oracle Container Databases from 19c to 26ai. By automating prechecks, fixups, deployment, and validation, it reduces manual effort, minimizes upgrade risks, and helps ensure a successful database upgrade with minimal downtime.