1. Overview
This document will explain about Uploading Excel data into Tables without using Plugin. This helps us to load large quantity of data into the database tables easily without using Plugin.
2. Technologies and Tools Used
The following technologies has been used to achieve the same.
- Oracle APEX
- APEX_COLLECTION
- PL/SQL Cursor
3. Use Case
Uploading Excel data into Tables without using Plugin:
Consider a scenario where you have been provided with a task to load of large numbers of excel data into a database table. However it can achieved by an APEX default data uploading feature. This above feature will also act an alternative to the pre-defined one without the usage of any plugin.
4. Architecture
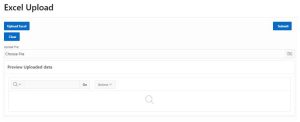
a) Setting up Basic Apex Page Items:
- Create a new page and create a page item with its “Type” as “File Browser”. This will enable the User to upload the desired excel file.
- Create the Classic report region to display the uploaded data and required buttons i.e
- Upload Excel – To upload the excel file
- Submit – To Final Submit the uploaded file
- Clear – To clear the previously uploaded excel file data in the front end.
Screenshot:
b) Creating a Collection and Inserting Excel Data into the collection:
Use the below code and create a process under “After submit”
begin
IF APEX_COLLECTION.COLLECTION_EXISTS(‘Collection_name’) THEN
APEX_COLLECTION.TRUNCATE_COLLECTION(‘Collection_name’);
END IF;
IF NOT APEX_COLLECTION.COLLECTION_EXISTS(‘Collection_name’) THEN
APEX_COLLECTION.CREATE_COLLECTION(‘Collection_name’);
END IF;
for r1 in (select * from
apex_application_temp_files f, table( apex_data_parser.parse(
p_content => f.blob_content,
p_add_headers_row => ‘Y’,
–p_store_profile_to_collection => ‘FILE_PROV_CASH’,
p_file_name => f.filename,
p_skip_rows => 1 ) ) p –This line will skip excel the first row, as I contain heading only
where f.name = :P3_UPLOAD_FILE –Page Item name
)
loop
APEX_COLLECTION.ADD_MEMBER(P_COLLECTION_NAME => ‘Collection_name’,
P_C001 => nvl(REPLACE(r1.col001,’-‘,”),0),
P_C002 => nvl(REPLACE(r1.col002,’-‘,”),0),
P_C003 => nvl(REPLACE(r1.col003,’-‘,”),0),
P_C004 => nvl(REPLACE(r1.col004,’-‘,”),0),
P_C005 => nvl(REPLACE(r1.col005,’-‘,”),0),
P_C006 => nvl(REPLACE(r1.col006,’-‘,”),0),
P_C007 => nvl(REPLACE(r1.col007,’-‘,”),0),
P_C008 => nvl(REPLACE(r1.col008,’-‘,”),0),
P_C009 => nvl(REPLACE(r1.col009,’-‘,”),0),
P_C010 => nvl(REPLACE(r1.col010,’-‘,”),0),
P_C011 => nvl(REPLACE(r1.col011,’-‘,”),0),
P_C012 => nvl(REPLACE(r1.col012,’-‘,”),0),
P_C013 => nvl(REPLACE(r1.col013,’-‘,”),0)
);
END LOOP;
end;
Once this process has been created under “After submit”, In Server-side Condition set “When Button Pressed” as
below:
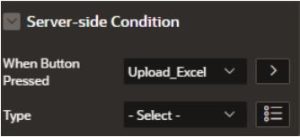
c) Inserting Collection data into Table:
Create another process using the below code to insert the data from the collection to the table
DECLARE
CURSOR C2 IS
SELECT C001, C002, C003, C004, C005, C006,
C007, C008, C009, C010, C011, C012,
C013, C014, C015, C016, C017, C018,
C019, C020, C021, C022, C023, C024, C025
FROM APEX_COLLECTIONS
WHERE
COLLECTION_NAME = ‘Collection_name’;
BEGIN
FOR I IN C2
LOOP
INSERT INTO (Table Name)
(
Table_column, –All table column
Table_column,
Table_column,
Table_column,
Table_column,
Table_column,
Table_column,
Table_column,
Table_column,
Table_column
)
VALUES(
I.C002, –collection data
I.C003,
I.C004,
I.C005,
I.C006,
I.C007,
I.C008,
I.C009,
I.C010
);
END LOOP;
END;
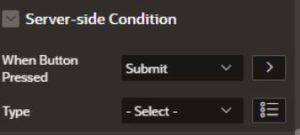
Once this process has been created, In Server-side Condition set “When Button Pressed” as below:
d) Review collection data before uploading it into the table:
Create a region below and select Type as “Interactive Report” and use the below SQL query to display the collection data
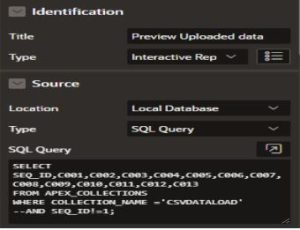
select seq_id, c001,c002,c003,c004,c005,c006,c007,c008,c009,c010,c011,c012,c013 from
APEX_COLLECTIONS
WHERE COLLECTION_NAME=’Collection name’ and seq_id!=1;
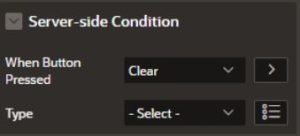
e) Delete Collection on Clear Button:
If found the collection data to be wrong we can use the below code to clear the data from the collection to create a separate process and map the “When Button Pressed” in Server-side Condition as below:
IF APEX_COLLECTION.COLLECTION_EXISTS(‘Collection_name’) THEN
APEX_COLLECTION.TRUNCATE_COLLECTION(‘Collection_name’);
END IF;
5. Conclusion
Hence by following the above steps we can upload Excel Data into Database tables without the use of any plugins.