Description:
In this article step by step Cloning the asm instance in same host.Earlier we use to clone database using rman backup. After adding the database service entry and restore the database from the backup location.
Environment Details:
Source database:
Database name : Asmdb
Archivelog Mode : ON
Version : 19.0.0
Host ipaddress : 192.168.1.101
Filesystem : ASM
Diskgroup : +DATA
GI_HOME : /u01/app/oracle/product/19.0.0/dbhome_1/grid
ORACLE_HOME : /u01/app/oracle/product/19.0.0/dbhome_1
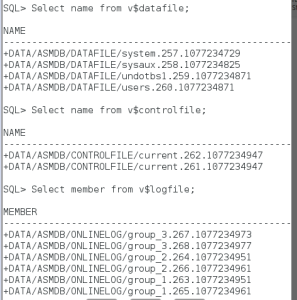
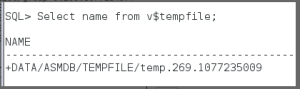
Step 1: Check the Instance details we are going to clone
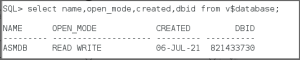
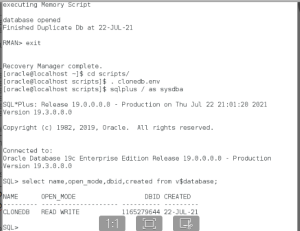
select name,open_mode,created,dbid from v$database;
Select name from v$datafile;
Select name from v$controlfile;
Select member from v$logfile;
Select name from v$tempfile;
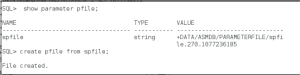
Step 3: show the parameter pfile and create pfile from spfile
Target database (On the auxiliary host):
Database name :Clonedb
Archivelog Mode : ON
Version : 19.0.0
Host ipaddress : 192.168.1.101
Filesystem : ASM
Diskgroup : +DATA
GI_HOME :/u01/app/oracle/product/19.0.0/dbhome_1/grid
ORACLE_HOME :/u01/app/oracle/product/19.0.0/dbhome_1
Step 4: Edit the Parameter file for the cloned instance db ( clonedb ) and create a audit file directory
[oracle@localhost dbs]$ cat initclonedb.ora
clonedb.__data_transfer_cache_size=0

clonedb.__db_cache_size=1040187392

clonedb.__inmemory_ext_roarea=0

clonedb.__inmemory_ext_rwarea=0

clonedb.__java_pool_size=0

clonedb.__large_pool_size=16777216

clonedb.__oracle_base='/u01/app/oracle'#ORACLE_BASE set from environment

clonedb.__pga_aggregate_target=503316480

clonedb.__sga_target=1509949440

clonedb.__shared_io_pool_size=83886080

clonedb.__shared_pool_size=352321536

clonedb.__streams_pool_size=0

clonedb.__unified_pga_pool_size=0

*.audit_file_dest='/u01/app/oracle/admin/clonedb/adump'

*.audit_trail='db'

*.compatible='19.0.0'

*.control_files='+DATA'

*.db_block_size=8192

*.db_create_file_dest='+DATA'

*.db_name='clonedb'

*.db_recovery_file_dest='+DATA'

*.db_recovery_file_dest_size=8256m

*.diagnostic_dest='/u01/app/oracle'

*.dispatchers='(PROTOCOL=TCP) (SERVICE=clonedbXDB)'

*.local_listener='LISTENER_CLONEDB'

*.log_archive_format='%t_%s_%r.dbf'

*.nls_language='ENGLISH'

*.nls_territory='UNITED KINGDOM'

*.open_cursors=300

*.pga_aggregate_target=477m

*.processes=300

*.remote_login_passwordfile='EXCLUSIVE'

*.sga_target=1429m

*.undo_tablespace='UNDOTBS1'
[oracle@localhost dbs]$ cp orapwasmdb orapwclonedb
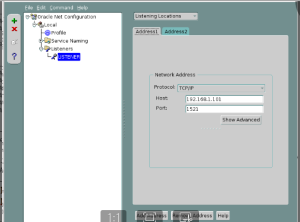
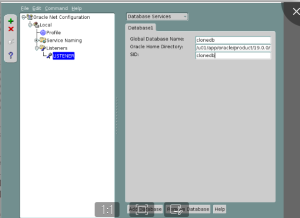
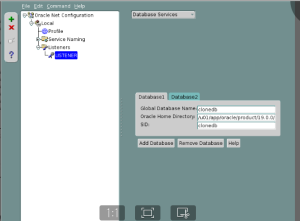
- Adding a database entry in listener.ora and tnsnames.ora by using the netmgr tool
- Run the netmgr command to add database entry in listener.ora by sourcing the grid env.
- Click the Listeners –> LISTENER
- Click the database Services and add the entry
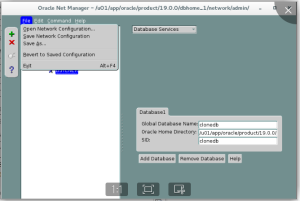
- Click File –> save network configuration –> exit
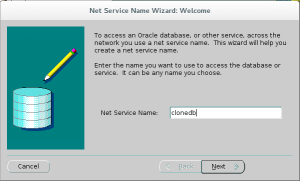
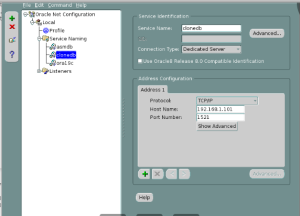
- Run the netmgr command to add database entry in tnsnames.ora by sourcing the database env
- Click the Service naming
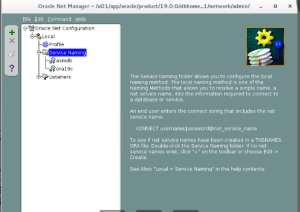
- Enter the Service name
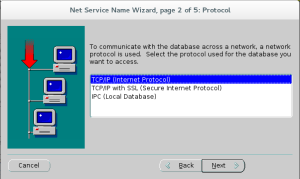
- Select the TCP/IP and click next.
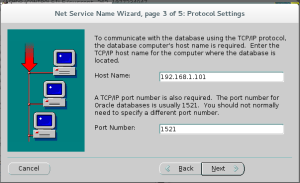
Enter the Hostname and port number correctly.
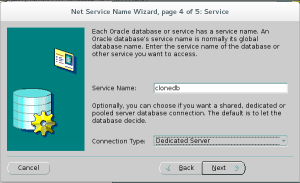
Click File –> Next and save network configuration –> exit
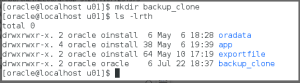
Step 5: Create the directory for backup clone using recover
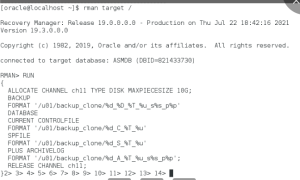
Script for backup the database using rman
Connect the rman target /
RUN
{
ALLOCATE CHANNEL ch11 TYPE DISK MAXPIECESIZE 10G;
BACKUP
FORMAT ‘/u01/backup_clone/%d_%D_%T_%u_s%s_p%p’
DATABASE
CURRENT CONTROLFILE
FORMAT ‘/u01/backup_clone/%d_C_%T_%u’
SPFILE
FORMAT ‘/u01/backup_clone/%d_S_%T_%u’
PLUS ARCHIVELOG
FORMAT ‘/u01/backup_clone/%d_A_%T_%u_s%s_p%p’;
RELEASE CHANNEL ch11;
}
Set the Environment file:
[oracle@localhost scripts]$ cat clonedb.env
export ORACLE_SID=clonedb
export ORACLE_HOME=$DB_HOME
export PATH=$ORACLE_HOME/bin:$BASE_PATH
export LD_LIBRARY_PATH=$ORACLE_HOME/lib:/lib:/usr/lib
export CLASSPATH=$ORACLE_HOME/JRE:$ORACLE_HOME/jlib:$ORACLE_HOME/rdbms/jlib

[oracle@localhost ~]$ srvctl add database -d clonedb -o /u01/app/oracle/product/19.0.0/dbhome_1
![]()
- Start the database in spfile
- Create spfile from pfile
- Check the spfile created in ASM disk
Step 6: Edit the pfile to change the spfile path to be reflected
![]()
Step 7: Now start the database in spfile nomount state
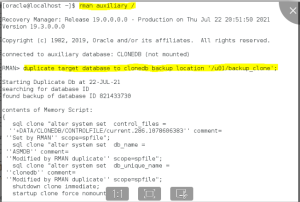
Step 8: Restore the database from backup and enter the new clone name to create.
duplicate target database to clonedb backup location ‘/u01/backup_clone’;
Step 9: Check all the database files are created in ASM disk
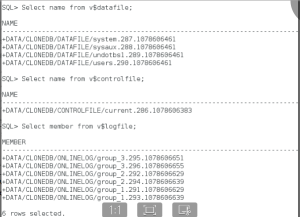
Select name from v$datafile;
Select name from v$controlfile;
Select member from v$logfile;
Select name from v$tempfile;

Step 10: Check the database entry has added to oratab
We have successfully asm db cloned in same host using RMAN.