
Onboarding a new employee usually involves the same repetitive IT task over and over: someone gets a list of new hires, an admin manually checks whether each person already has a network account, creates one if not, sets a temporary password, drops them into the right OU and security groups, and then emails the credentials back out. It’s tedious, error-prone, and doesn’t scale well when hiring volume spikes.
This post walks through a workflow that automates the entire chain — from pulling new hire records directly out of the hiring team’s application, through a fully provisioned Active Directory account, to an automated notification email — using Power Automate, SharePoint, and PowerShell with the Microsoft Graph SDK.
The Problem
The hiring team already enters new hire details (employee ID/associate ID, name, department, manager, etc.) into their own application. Someone still needs to:
- Get that data out of the hiring app and into a format IT’s provisioning script can consume.
- Turn each row into a working NT ID (AD account).
- Make sure duplicates aren’t created for people who already have accounts.
- Set mandatory attributes, a temporary password, an OU, and group memberships.
- Get the new credentials back to the requester without manual copy-paste.
Doing this by hand for one or two hires is fine. Doing it for fifty hires in a single batch — including the manual “export from the hiring app, reformat, upload” step — is where things break down.
Prerequisites
Before building this out, have the following in place:
Microsoft Entra ID / Azure AD
- An app registration for the Graph-based PowerShell script, with certificate-based authentication configured (avoid client secrets for anything unattended).
- Application permissions scoped narrowly — Sites.Selected against just the target SharePoint site, rather than tenant-wide Sites.ReadWrite.All.
Active Directory
- A dedicated service account for the provisioning script, delegated rights over only the specific OU(s) it needs to create users in (not domain-wide user-creation rights).
- Agreement on the NT ID naming convention and which AD attribute will be used as the unique key for de-duplication (commonly a custom employeeID attribute).
- The ActiveDirectory PowerShell module available wherever the script runs (a domain-joined server or a runbook worker with RSAT tools installed).
PowerShell environment
- Microsoft.Graph PowerShell module.
- ImportExcel PowerShell module (since the working file is .xlsx, not .csv — more on why below).
- A scheduled task, Azure Automation runbook, or similar to run the script unattended on a trigger or schedule.
SharePoint
- A document library to act as the drop point/staging area for the new hire file that Power Automate generates.
Power Automate
- A premium plan or per-flow license if the hiring app doesn’t have a first-party Power Automate connector and you’ll need the HTTP action or a custom connector to call its API.
- Access to the hiring app’s API (endpoint URL, authentication method — API key, OAuth, or basic auth) if a custom connector is required.
- The Excel Online (Business) connector, which expects data to live inside a defined Excel Table, not just cells with headers — the workbook Power Automate generates needs a table object for “Add a row into a table” to work.
Architecture at a Glance
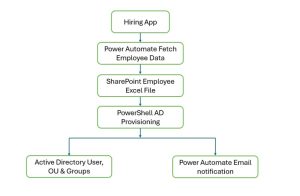
The flow is intentionally split into three automation layers:
- Power Automate (intake) pulls the new hire records straight from the hiring application and lands them in SharePoint as a structured .xlsx file — no manual export/upload step.
- PowerShell handles anything that needs to talk to on-prem Active Directory, since Power Automate has no native, secure way to create AD accounts.
- Power Automate (notification) watches for the updated file and sends the email, which it’s well suited for and doesn’t require any custom scripting.
Step 1: Power Automate Fetches New Hire Records from the Hiring App
Instead of relying on someone to manually export and upload a spreadsheet, the flow connects directly to the hiring team’s application:
- If the app has a native Power Automate connector (many HR/ATS platforms do, or expose one through Dataverse/SQL), use it directly with a “List records” / “Get rows” style action.
- If it doesn’t, but exposes a REST API, use the built-in HTTP action (premium) or build a Custom Connector so the call is reusable and can carry proper authentication (API key, OAuth, or basic auth) rather than hardcoded credentials in every flow.
This removes the manual step entirely — the hiring team just does their normal data entry in their own app, and the file PowerShell needs shows up in SharePoint on its own.
Step 2: Connect to SharePoint with Microsoft.Graph and Read the Workbook
PowerShell picks up the file using the Microsoft.Graph module rather than the older SharePoint CSOM libraries, since Graph is the supported, modern path and works well with app-only authentication via an Entra ID app registration. Because the file is now .xlsx, the script downloads it and reads it with ImportExcel rather than ConvertFrom-Csv.
Using a certificate-based app registration (rather than a delegated user login) means this can run unattended as a scheduled task or Azure Automation runbook.
Step 3: Check Whether the User Already Exists
For each row, the script checks AD for an existing account tied to the employee ID or associate ID — using a custom attribute like employeeID rather than name matching, since names collide and people get rehired.
Step 4: Create the NT ID with Mandatory Fields, OU, and Groups
If no account exists, the script generates an NT ID (commonly a standard naming convention like first-initial + last name, with a numeric suffix on collision), a random temporary password, and creates the account in the correct OU with the correct group memberships — all in one pass.
A few parameters worth calling out as “mandatory field” candidates depending on your environment: -Path (target OU), -EmployeeID (the key used for de-duplication in Step 3), -ChangePasswordAtLogon, and whatever custom attributes your helpdesk or ticketing system expects (cost center, manager DN, office location, etc.). All of these can be driven straight from the workbook’s columns.
Step 5: Append NT_ID and Temp_Password Back to the Workbook
Once the account is created, the script appends two new columns — NT_ID and Temp_Password — to the in-memory data and writes the updated workbook back to SharePoint, overwriting or versioning the original file. ImportExcel’s Export-Excel can write straight back into the same Excel Table so the Excel Online connector on the Power Automate side keeps working against it unchanged.
Keeping the write-back on the same file (rather than a separate output file) means the notification flow only has to watch one location for the trigger.
Step 6: Power Automate Picks Up the Update and Sends the Email
A second Power Automate flow, triggered on “When a file is modified” in the SharePoint library, uses Excel Online (Business) → List rows present in a table to read the updated workbook, loops through rows where NT_ID and Temp_Password are populated, and sends a notification email to the new hire’s manager or the HR requester with the new credentials (ideally through a secure, expiring link or an email that forces a password change on first use).
Security Considerations
A few things worth being deliberate about before putting this into production:
- Credentials in transit: sending temp passwords by plain email is common but not great practice. Consider a secure portal link, or splitting the password into a separate SMS/Teams message.
- App registration permissions: scope the Graph app registration to only the SharePoint site/library it needs (Sites.Selected), not tenant-wide access.
- Hiring app connector/API credentials: store them in the custom connector’s connection reference or Azure Key Vault, not inline in the flow, and use the least-privileged read scope the hiring app’s API offers.
- Least privilege for the AD service account: the account running New-ADUser should only have rights over the specific OU(s) it provisions into, not domain-wide user creation rights.
- Audit logging: log every account creation (who was created, by which run, at what time) separately from the workbook itself, since the workbook will get overwritten on the next run.
- Password complexity and expiry: make sure the generated password meets your domain’s complexity policy and is flagged to expire/force-change at first logon.
Wrapping Up
The pattern here — Power Automate pulling directly from the hiring app, an Excel-Table-backed workbook in SharePoint as the hand-off point, PowerShell with Microsoft.Graph and ImportExcel as the AD provisioning engine, and a second Power Automate flow as the notification layer — takes a manual, multi-touch onboarding process and turns it into something close to hands-off. The heavy lifting (AD account creation, OU placement, group membership, de-duplication) stays in PowerShell where it belongs, and both the intake and the “glue” work of watching for file changes and sending emails stay in Power Automate where no custom code is needed.
From here, natural next steps include adding error handling and retry logic around the AD calls, writing results to a dedicated SharePoint log list instead of just the workbook, and extending the flow to also raise a ticket automatically if provisioning fails.
