This Document will explain the steps to create Supplier Bank account and assign the supplier to the Bank account in Oracle Apps 11i.
In Payables, you can define external banks where your suppliers are the account holders.
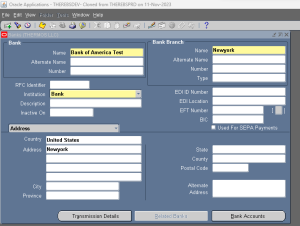
To enter a basic bank:
- In the Banks window, enter all basic bank information: bank name, branch name, bank number, branch number, and address.
Note: If this is a U.S.-based bank, enter the American Banking Association nine-digit transit routing number in the Bank Branch Number field. The bank branch number must be included on both internal and supplier banks referenced by the NACHA (National Automated Clearing House Association) electronic payment format.
- Select Bank as the Institution.
- Optionally enter the EFT (electronic funds transfer) Number.
- Optionally enter names and information for your bank contacts in the Contact region.
- Save your work.
Defining Supplier Bank Accounts
If you use Payables, you can enter bank information for bank accounts for which your supplier is the account holder. You then assign these accounts to the supplier and its sites. Payables uses this bank information when you create electronic payments for your suppliers.
You can either define the supplier first and then when you define the bank account you can associate it with the supplier in the Supplier Assignments region (as described below). Or you can define the bank account first and then assign it to the supplier when you enter the supplier in the Suppliers window.
The primary supplier bank account defaults from the supplier site to the scheduled payments on an invoice. When you make a supplier bank account inactive, Payables displays a message to automatically replace that account on any unpaid or partially paid scheduled payments with the supplier’s primary bank account. Payables ensures that a payment cannot be made to an inactive supplier remittance account. Payables notifies you if you attempt such payment.
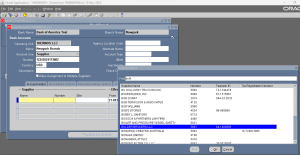
To define a supplier bank account:
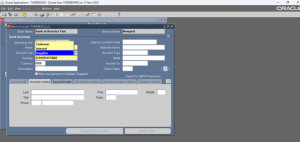
- In the Banks window query an existing Bank.
- Choose the Bank Accounts button. Enter the Bank Account Name and Bank Account Number.
Suggestion: Use the supplier name or supplier number in the bank account name and description to make it easy to identify later.
- Enter the EDI ID number only if you have installed Oracle Energy. Optionally enter an Account Type and Description.
- Optionally change the account currency, which defaults from your functional currency. Leave the account currency blank if you want the account to receive payments in multiple currencies.
- If you want to use Bank Account validation, enter Check Digits.
- Select Supplier as the Account Use.
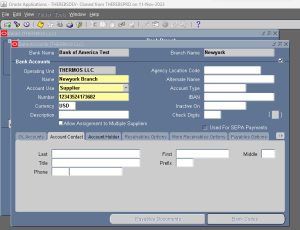
- To enable this bank account to receive payments for multiple suppliers, enable the Allow Assignment to Multiple Suppliers option. See: Factoring Arrangements.
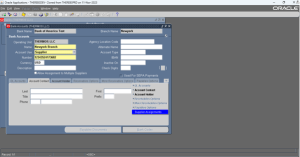
- In the Supplier Assignments region list the supplier, and optionally list supplier sites, that use the account to receive electronic payments.
- Optionally enter account holder information in the Account Holder region.
Note: If you are processing NACHA-formatted electronic payments, in the Alternate Account Holder field, enter the exact name of the tax reporting entity that should be referenced by the NACHA payment format.
- Optionally enter contact information in the Account Contact region.
- Save your work.
- In the Bank Accounts region of the Suppliers and Supplier Sites windows, verify for each supplier and site that all appropriate bank accounts are listed. For suppliers and supplier sites with multiple bank accounts, designate as the primary bank account one bank account per period and per currency.
Steps:
Step1: Login to the Oracle Instance and Navigate to Payables Responsibility:
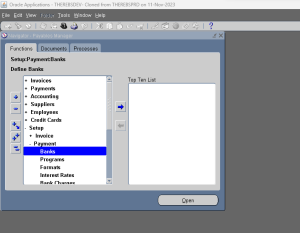
Step2: Bank Creation Navigation: Payables –> Setup –> Payment–>Banks
Step3: Enter Bank Name, Branch Name, Bank Address and Institution as Bank.
Step4: Click Bank Account
Step5: Enter Bank Account Details and Select Account use as Supplier.
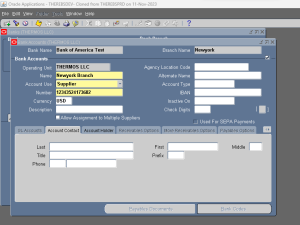
Step6: Select Account Use as Supplier
Step7: Click the Highlighted Arrow Mark
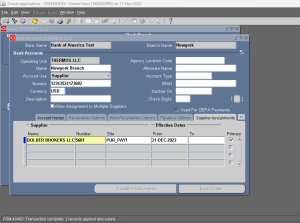
Step8: Click Supplier Assignment’s
Step9: A new Tap will appear to assign the Supplier details to the Bank
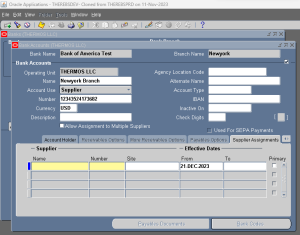
Step10: Select Supplier from the List of Values
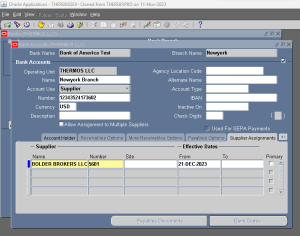
Step11: Select Supplier Site if required, It is an optional filed.

Step12: Enable to Primary Check Box
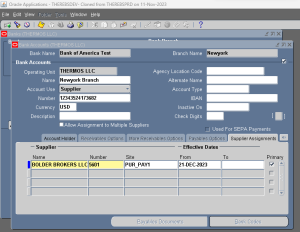
Step13: Save the Work
Bank Accounts Region of the Suppliers and Supplier Sites Windows
Use this region to record the supplier bank accounts that your suppliers and supplier sites use for electronic payment transactions.
Bank accounts you have already assigned to the supplier or supplier site in the Bank Accounts window will appear here. Information you enter in this region of the Supplier and Supplier Sites windows will appear in the Supplier Assignments region of the Bank Accounts window. The Bank Accounts region appears for new supplier sites after you save the supplier site. When you enter bank accounts for a supplier site, Payables defaults all of the supplier’s active bank accounts. At any time you can add bank accounts for a supplier or supplier site. You can also change the effective dates at any time to make a bank assignment inactive. Updating bank accounts for a supplier will not affect bank accounts for existing supplier sites.
If you want to view detailed information or update a bank account listed in this window, you can double click on the current record indicator to navigate to the Banks window.
Name: Name of the bank account that this supplier or supplier site uses. The list of values includes only active supplier bank accounts that are either not yet assigned to a different supplier or site within a different supplier, or have the Allow Assignment to Multiple Suppliers option enabled on the account, such as factor company accounts.
Number: Bank account number of the supplier’s remittance account.
Primary: Enable this check box to have Payables use this bank account as a default when you pay this supplier electronically. For each supplier and supplier site that has bank account assignments, you must designate as the primary bank account exactly one bank account per currency. For all periods during which a supplier or site has active bank accounts, you must specify a primary bank account. When you enter an invoice, the supplier site primary bank account for the invoice currency defaults to each scheduled payment. If no primary bank account is selected for the supplier site, then the system uses the supplier’s primary bank account. The Remit-To Bank Account for the scheduled payment then defaults to the payment.
If you enable the Allow Remit-To Account Override Payables option, you can override the Remit-To Bank Account value in the Scheduled Payments tab, the Payments tab, and the Modify Payment Batch window with any other remit-to bank with the same currency and for the same supplier.
Effective Dates From/To: Enter dates if you want to limit the time during which a supplier site uses this bank account as the primary bank account for receiving electronic payments in the bank account currency.