OEM UPGRADE FROM 13.4 TO 13.5
PRE-REQUISITE:
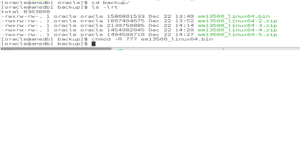
- First, we need to take a backup of the Middleware Home, the Management Repository, Central inventory, Software library, Management Agent.
- The minimum version supported for upgrading to OEM 13.5 is 13.3. If the OMS is at 12.1.0.x, 13.1 or 13.2, it is mandatory that it is first upgraded to 13.3.0.0.0 or 13.4.0.0.0.
PRE-UPGRADE STEPS:
Step1: Download OEM 13.5 software files from below link
https://www.oracle.com/enterprise-manager/downloads/linux-x86-64-13c-rel5-downloads.html
Here, I have moved the software files to backup directory in /u01/app/backup.
Step 2: The below list of plug-ins is obsolete and support for these plug-ins is discontinued. These plug-ins must be undeployed from the Oracle Management Agents and Oracle Management Services before start with the upgrade.
Cloud Services Management (oracle.sysman.csm)
Microsoft .NET Framework (oracle.em.smdn)
Microsoft Active Directory (oracle.em.smad)
SYSMAN- Doyen_123
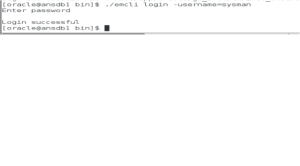
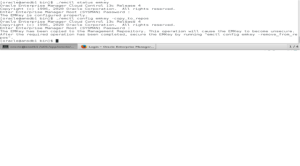
[oracle@ansdb1 bin]$ ./emcli login -username=sysman
Enter password
Login successful
[oracle@ansdb1 bin]$ ./emcli sync
Synchronized successfully
[oracle@ansdb1 bin]$ ./emcli list_plugins_on_server
OMS name is ansdb1.localdomain.com:4889_Management_Service
Plug-in Name Plugin-id Version [revision]
Oracle Cloud Framework oracle.sysman.cfw 13.4.1.0.0
Oracle Database oracle.sysman.db 13.4.1.0.0
Oracle Fusion Middleware oracle.sysman.emas 13.4.1.0.0
Systems Infrastructure oracle.sysman.si 13.4.1.0.0
Oracle Exadata oracle.sysman.xa 13.4.1.0.0
[oracle@ansdb1 bin]$
Step 3: If there are a large number of Propagate Target jobs, then the Repository Upgrade can consume a very long time or stuck while executing.
“upgrade/post_jobtype_upgrade.sql”. Check if there are a large number of jobs that are stuck using the below query:
SQL> conn sysman/Doyen_123
Connected.
SQL> select mt.target_name||’ Agent Version=’|| mtp.property_value from mgmt_target_properties mtp , mgmt_targets mt where mt.target_type=’oracle_emd’ and mt.target_guid = mtp.target_guid and mtp.property_name=’Version’ and mtp.property_value < ‘13.3.0.0.0’;
no rows selected.
NOTE: –
If jobs of type “PropagateTarget” are listed, clean up the stuck jobs by running the below query till there are no more rows left for update:
UPDATE MGMT_JOB_EXEC_SUMMARY SET status = 23 WHERE status = 15
AND job_type_id IN (SELECT job_type_id FROM MGMT_JOB_TYPE_INFO WHERE job_type = ‘PropagateTarget’)
AND rownum < 100*1000;
commit;
end loop;
end if;
end loop;
end;
/
If there are any other job types, contact Oracle Support.
Step 5:
Ensure that the tables in the Management Repository do not have any snapshots created:
SQL> select master, log_table from all_mview_logs where log_owner=’SYSMAN’;
no rows selected
If there are snapshots, then drop them by running the following command as SYSMAN user:
SQL> Drop snapshot log on <master in above output>;
Step 6:
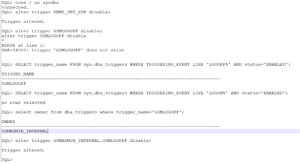
Ensure that there are no logon or logoff triggers set in the Oracle Database that houses the Oracle Management Repository.
SQL> SELECT trigger_name FROM sys.dba_triggers WHERE TRIGGERING_EVENT LIKE ‘LOGON%’ AND status=’ENABLED’;
TRIGGER_NAME
DBMS_SET_PDB
SQL> SELECT trigger_name FROM sys.dba_triggers WHERE TRIGGERING_EVENT LIKE ‘LOGOFF%’ AND status=’ENABLED’;
TRIGGER_NAME
GSMLOGOFF
If there are any logon or logoff triggers, disable them as follows:
SQL> alter trigger <trigger_name> disable;
Step 7:
For improved SQL performance all the adaptive features parameters should be unset prior to the upgrade:
alter system reset “_optimizer_nlj_hj_adaptive_join” scope=both sid=’*’;
alter system reset “_optimizer_strans_adaptive_pruning” scope=both sid=’*’;
alter system reset “_px_adaptive_dist_method” scope=both sid=’*’;
alter system reset “_sql_plan_directive_mgmt_control” scope=both sid=’*’;
alter system reset “_optimizer_dsdir_usage_control” scope=both sid=’*’;
alter system reset “_optimizer_use_feedback” scope=both sid=’*’;
alter system reset “_optimizer_gather_feedback” scope=both sid=’*’;
alter system reset “_optimizer_performance_feedback” scope=both sid=’*’;
Step 8: EMKEY Copy Requirements:
$<ORACLE_HOME>/bin/emctl config emkey -copy_to_repos [-sysman_pwd <sysman_pwd>]
Prior to the upgrade, the EM KEY must be copied into the repository:
UPGRADE STAGE:-
Initiate Upgrade- Execute the .bin file from which you have download and saved location (follow Pre-upgrade Step 1)
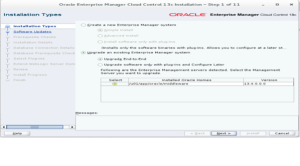
Step 1: Once initiated the upgrade operation, It will open a GUI window and ask to choose any of them in option, Here we need to choose “Upgrade end to end” option along with “Installed oracle homes” and click next.
Step 2: Here just click “SKIP” option and click next button.

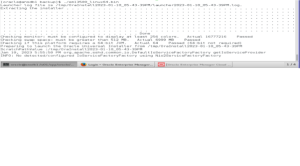
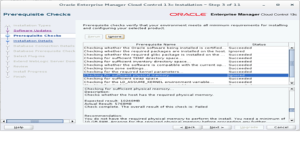
Step 3: In this stage, the prerequisite will be run and show the result.
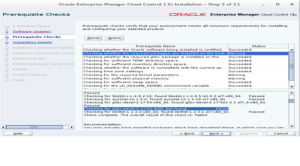
Here, Highlighted error in above image, we can safely ignore, for your reference kindly see below oracle document. Doc ID 1478035.1
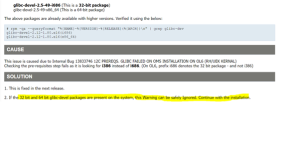
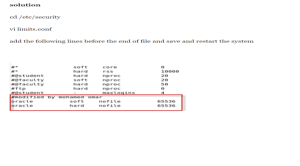
For below warning we need to add softnofiles like below solution.
After adding soft nofiles and hard nofiles in /etc/security file and recompile it.
Then below warning we should increase the required physical memory size. In my scenario I have ignored it and click next.
Step 4: In this stage we need mentioned the new middleware home for keep software binaries and click next.
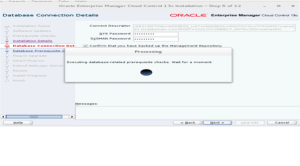
Step 5: In this stage we need mentioned SYS and SYSMAN password (Which you created in OEMENT (OEMDB) database), then disable the DDMP jobs and click next.

Now it will check the prerequisite for upgrade in background.
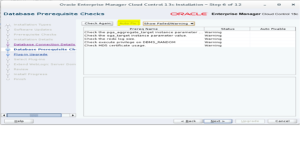
Step 6: Here it will show the result of prerequisite. Please follow the note given below and click next.
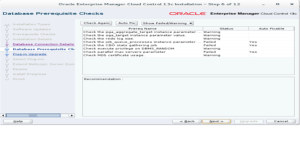
Note: – Fix the DB prerequisite checks using Auto fix if any error and click NEXT. You can ignore warnings for now and fix them later.
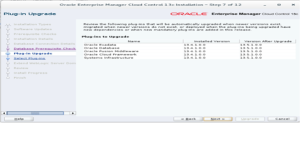
Step 7: Just review the plugins to upgrade from 13.4 to 13.5 and click next.
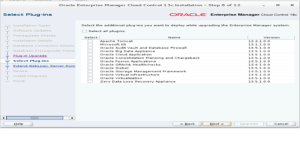
Step 8: From this you can also deploy the additional plugins you needed to add while upgrade. In my case I skipped for now as clicked next.
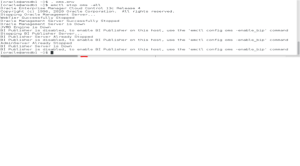
Note: – If you get this below error, solution for this is, we need to down all OMS services in OS level.
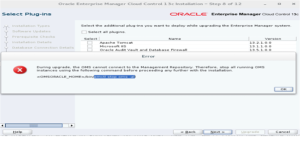
To Down all the OMS service please follow the below screen shot. Once all the OMS services are down and click next again it will be clear.
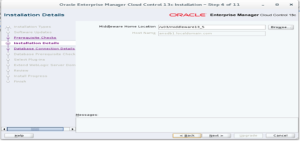
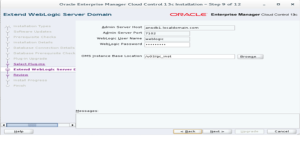
Step 9: In this stage, we need to enter the host and port details, WebLogic username and passwords and then OMS instance base location and click next.
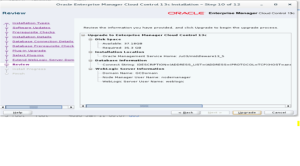
Step 10: Here, you can review the configuration details which you have provided in above steps and click next.
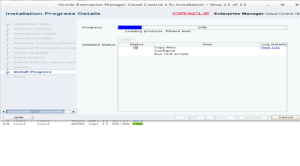
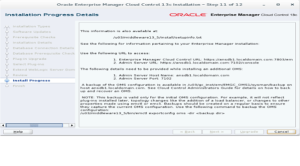
Step 11: Monitor the OEM upgrade process until its complete to avoid errors.
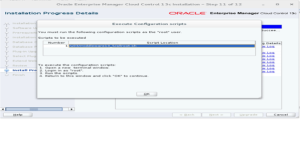
Once the upgrade completed. System asks us to run the allroot.sh script to run as root user. Execute the script and click OK.
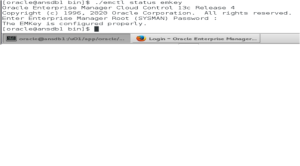
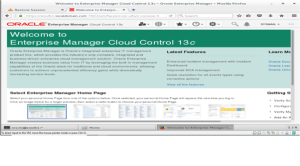
Finally, we have completed OEM Upgrade from 13.4 to 13.5 and not below port numbers and links to access front end.
Login into OEM front end console for testing purpose by using above link and port details, successfully completed.
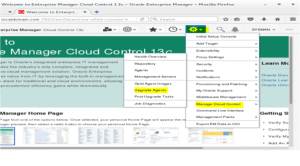
Step 12: Agent upgrade from 13.4 to 13.5
Login into console go to “setup”–> “Manage cloud control” –> “Upgrade agents”.
Step 13: Click “Add” option to select which agent to upgrade and click “OK”.
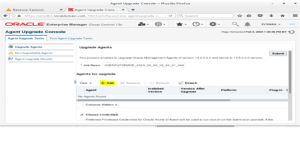
Step 14:- Agent upgrade is in progress.
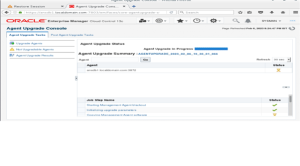
Agent upgrade completed successfully…

Now Agent and OMS services are up and running with 13.5 version.

REFERENCE DOC: 13.5: Checklist for Upgrading Enterprise Manager Cloud Control from Version 13.3/13.4 to 13.5 (Doc ID 2761728.1)