Description:-
There are different ways of upgrading to the latest release of Oracle database and Oracle provides multiple methods to upgrade. Few are listed below:
- Database Upgrade Assistant (DBUA)
- Manual Upgrade
- Transportable Tablespaces
- Datapump export/import
- Oracle Streams
- Oracle GoldenGate
Database Upgrade Assistant (DBUA)
Here I am going to choose DBUA to upgrade my database,DBUA provides a graphical user interface to guide you through the upgrade of Oracle Database.
Below Oracle versions can be directly upgraded to 19c.
- 2.0.4
- 1.0.2
- 2.0.1
- 18c
The following steps for complete before upgrading:
- Oracle19c database Installation Prerequisites.
- Installation of Oracle 19.3.0.0 binaries
- Creation of set up software only in 19c.
Environment Details:
| Details | Source | Target |
| OS Version | OEL 7.3 (64 bit) | OEL 7.3 (64 bit) |
| DB Version | 11.2.0.4 | 19.0.0.0 |
| Database name | orcl11g | orcl11g |
| oracle_home | /u01/app/oracle/product/11.2.0/db_1 | /u01/app/oracle/product/19.0.0 |
| timezone version | 14 | 32 |
Steps for upgrade from 11.2.0.4 to 19.0.0.0 using DBUA :
Presteps for db upgrade :
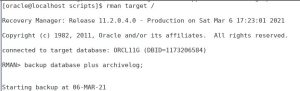
Step 1:Take RMAN full backups before upgrade.
RMAN> backup database plus archivelog;
Step 2:Ensure backup is complete before upgrade.
SQL> SELECT * FROM v$backup WHERE status != ‘NOT ACTIVE’;
![]()
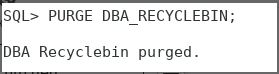
Step 3:Empty Recycle bin.
SQL> PURGE DBA_RECYCLEBIN ;
Step 4:Run Gather statistics to finish upgrade soon.
SQL> EXEC DBMS_STATS.GATHER_DICTIONARY_STATS;

Step 5: Remove EM Database Control :
Copy the $ORACLE_HOME/rdbms/admin/emremove.sql script from the target 19.2.0.0.0 ORACLE_HOME into the source 11.2.0.4.0 ORACLE_HOME.
SQL> @emremove.sql
Step 6: Remove OLAP Catalog :
[oracle@localhost scripts]$ cd $ORACLE_HOME/olap/admin/
SQL> @catnoamd.sql
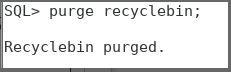
Purge Recyclebin :
SQL> purge recyclebin;
Step 7: Run the preupgrade tool.
The preupgrade.jar Pre-Upgrade Information Tool is supplied with Oracle Database 19c.This tool has reside in new oracle home.
/u01/app/oracle/product/19.0.0/rdbms/admin/preupgrade.jar
[oracle@localhost scripts]$ . ora11g.env
[oracle@localhost scripts]$ /u01/app/oracle/product/11.2.0/db_1/jdk/bin/java -jar /u01/app/oracle/product/19.0.0/rdbms/admin/preupgrade.jar FILE DIR /u01/preupgrade/
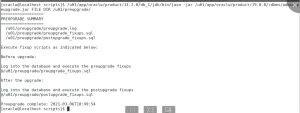
Step 8:Run preupgrade fixups.sql
SQL> @/u01/preupgrade/preupgrade_fixups.sql
SQL> @/u01/preupgrade/preupgrade_fixups.sql

Executing Oracle PRE-Upgrade Fixup Script

Auto-Generated by:       Oracle Preupgrade Script

                         Version: 19.0.0.0.0 Build: 1

Generated on:            2021-03-06 18:49:48

For Source Database:     ORCL11G

Source Database Version: 11.2.0.4.0

For Upgrade to Version:  19.0.0.0.0

Preup                             Preupgrade

Action                            Issue Is

Number  Preupgrade Check Name     Remedied    Further DBA Action

------  ------------------------  ----------  --------------------------------
-
min_recovery_area_size NO Manual fixup required.
-
parameter_min_val NO Manual fixup recommended.
-
em_present NO Manual fixup recommended.
-
amd_exists NO Manual fixup recommended.
-
apex_manual_upgrade NO Manual fixup recommended.
-
trgowner_no_admndbtrg YES None.
-
pre_fixed_objects YES None.
-
tablespaces_info NO Informational only.Further action is optional.
-
exf_rul_exists NO Informational only.Further action is optional.
-
 rman_recovery_version     NO          Informational only.Further action is optional.
The fixup scripts have been run and resolved what they can. However,
there are still issues originally identified by the preupgrade that
have not been remedied and are still present in the database.
Depending on the severity of the specific issue, and the nature of
the issue itself, that could mean that your database is not ready
for upgrade.  To resolve the outstanding issues, start by reviewing
the preupgrade_fixups.sql and searching it for the name of
the failed CHECK NAME or Preupgrade Action Number listed above.
There you will find the original corresponding diagnostic message
from the preupgrade which explains in more detail what still needsto be done.

PL/SQL procedure successfully completed.
Step 8: Run DBUA upgrade Utility :
Now run the dbua utility from 19c oracle_home location.
[oracle@localhost ~]$ export PATH=$ORACLE_HOME/bin:$PATH
[oracle@localhost ~]$ export ORACLE_SID=ora19c
[oracle@localhost ~]$ export ORACLE_HOME=/u01/app/oracle/product/19.0.0/
[oracle@localhost ~]$ dbua
(or)
[oracle@localhost scripts]$ . ora19c.env
[oracle@localhost scripts]$ dbua
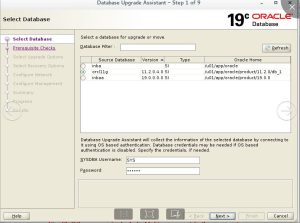
Step 9:Select the Upgrade Oracle Database option, then click the “Next” button.
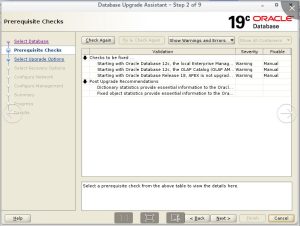
Step 10: If the prerequisite checks highlight any issues, take the appropriate action to fix the issues.But I have face the error for archive log mode enabled.
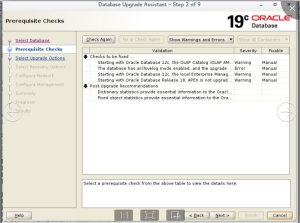
Disable archive log in mount stage of database
SQL> alter database noarchivelog;
Database altered.
SQL> alter database open;
Database altered.
SQL> archive log list;
Database log mode No Archive Mode
Automatic archival Disabled
Archive destination USE_DB_RECOVERY_FILE_DEST
Oldest online log sequence 4
Current log sequence 6
SQL>
Step 11: Disable the archive log mode now its cleared the issue. If all the prerequisite checks are passed, click the “Next” button.
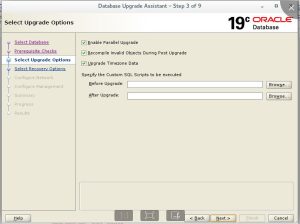
Step 12: Then click the “Next” button.
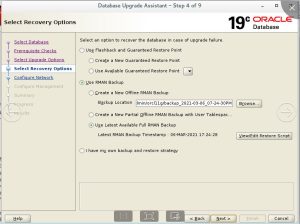
Step 13 : Select the recovery options for use in the event of an upgrade failure, then click the “Next” button.
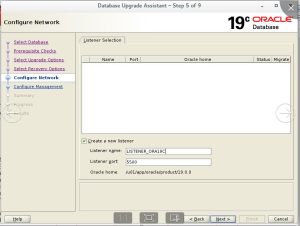
Step 14: If the database is using the 11g listener and you need to upgraded, use existing listener or create new 19c listener
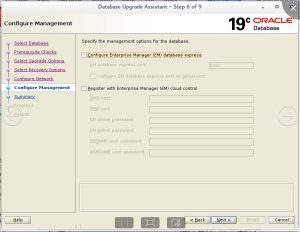
Step 15: If you want configure EM database express enable it and provide port number or uncheck it.
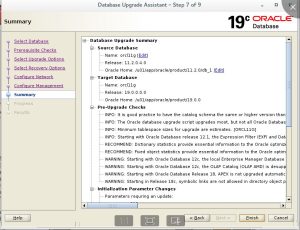


Step 16: Now the database upgrade is complete and Check the DB version,mode and timezone version.
SQL> select VERSION,name,open_mode from v$instance,v$database;
SQL> SELECT * FROM v$timezone_file;
