Introduction:
Row-Level Security (RLS) in Power BI controls data access at the row level based on user identity. It restricts users to viewing only the data that aligns with their role or permissions, ensuring data security and privacy.
Why we need to do :
Enhanced Data Security:
Ensures only authorized users access relevant data, reducing the risk of unauthorized access.
Fine-Grained Access Control:
Allows specific rules for data access, providing precise control over who sees what data.
Simplified Data Governance:
Centralizes access control within Power BI, simplifying data governance processes.
Improved Compliance:
Helps comply with regulatory requirements by enforcing data access controls.
Customized User Experiences:
Delivers personalized user experiences by tailoring data visibility to each user’s role or responsibilities.
Implementing RLS in Power BI:
Static vs. Dynamic Roles:
RLS uses roles to define user access levels. There are two primary approaches to create roles:
Static Roles:
These roles are based on pre-defined user attributes that don’t change frequently, such as username, email domain (e.g., “@sales.com”), or location. DAX expressions within the roles filter data based on these static attributes.
Dynamic Roles:
These roles leverage user properties from Azure Active Directory (AAD) or other sources to define user access dynamically. DAX expressions reference these dynamic attributes for granular data control, allowing access to adapt to user changes.
Step:1
Import data into your Power BI semantic model, or configure a DirectQuery connection.
Step:2
From the ribbon, select Manage roles.
![]()
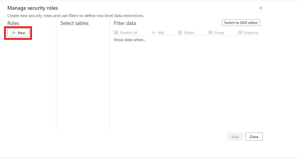
Step :3
From the Manage roles window, select New to create a new role.
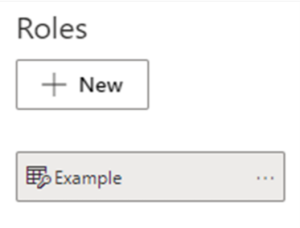
Step:4
Under Roles, provide a name for the role and select enter.
Step: 5
Under Select tables, select the table you want to apply a row-level security filter to.
Step:6
Under Filter data, use the default editor to define your roles. The expressions created return a true or false value.
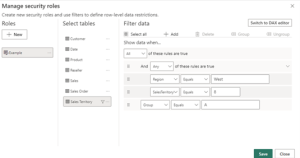
Not all row-level security filters supported in Power BI can be defined using the default editor. Limitations include expressions that today can only be defined using DAX including dynamic rules such as username() or userprincipalname(). To define roles using these filters switch to use the DAX editor.
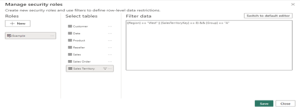
Step:7
Optionally select Switch to DAX editor to switch to use the DAX editor to define your role. You can switch back to the default editor by selecting Switch to default editor. All changes made in either editor interface persist when switching interfaces when possible.
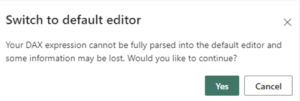
DAX Editor Warning:
Switching from the DAX editor while defining a role may cause information loss.
- Solution: Click “Cancel” to stay in the DAX editor and continue editing
Validate the roles within Power BI Desktop:
After you’ve created your roles, test the results of the roles within Power BI Desktop.
Step:1 Select View As Roles.
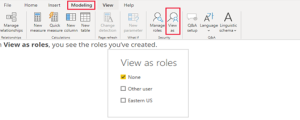
Step:2 Select a role you created > OK to apply that role. The report renders the data relevant for that role.
Step:3 You can also select Other user and supply a given user. It’s best to supply the User Principal Name (UPN) as that’s what the Power BI service and Power BI Report Server use.
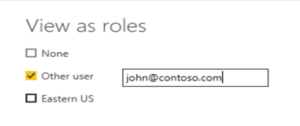
Step:4 Select OK and the report renders based on what that user can see.
Within Power BI Desktop, Other users only displays different results if you’re using dynamic security based on your DAX expressions.
Manage security on your model:
To manage security on your semantic model, open the workspace where you saved your semantic model in the Power BI service and do the following steps:
- In the Power BI service, select the More options menu for a semantic model. This menu appears when you hover on a semantic model name, whether you select it from the navigation menu or the workspace page.
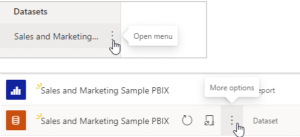
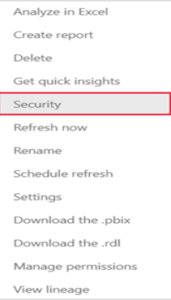
Security takes you to the Role-Level Security page where you add members to a role you created. Contributor (and higher workspace roles) will see Security and can assign users to a role.
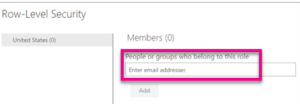
Working with Members
Add Members
You can add a member to the role by typing in the email address, or name, of the user, security group or distribution list you want to add. You cannot add Groups created within Power BI. You can add members external to your organization.
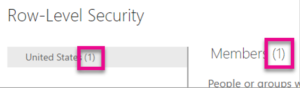
You can also see how many members are part of the role by the number in parenthesis next to the role name, or next to Members.
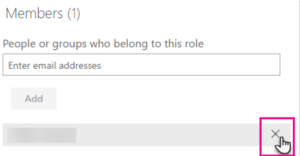
Remove members
You can remove members by selecting the X next to their name.
Testing and Validating RLS:
You can validate that the role you defined is working correctly in the Power BI service by testing the role.
- Select More options (…) next to the role.
- Select Test as role.
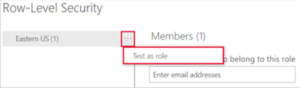
- You’re redirected to the report that was published from Power BI Desktop with this semantic model, if it exists. Dashboards aren’t available for testing using the Test as role option.
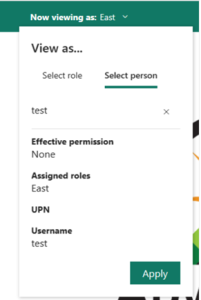
- In the page header, the role being applied is shown. Test other roles, a combination of roles, or a specific person by selecting Now viewing as. Here you see important permissions details pertaining to the individual or role being tested.
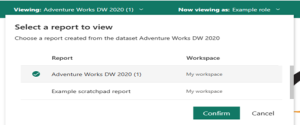
Test other reports connected to the semantic model by selecting Viewing in the page header. You can only test reports located in the same workspace as your semantic model.
To return to normal viewing, select Back to Row-Level Security.
Using the username() or userprincipalname() DAX function:
You can take advantage of the DAX functions username() or userprincipalname() within your dataset. You can use them within expressions in Power BI Desktop. When you publish your model, it will be used within the Power BI service.
Within Power BI Desktop, username() will return a user in the format of DOMAINUser and userprincipalname() will return a user in the format of user@contoso.com.
Within the Power BI service, username() and userprincipalname() will both return the user’s User Principal Name (UPN). This looks similar to an email address.
Best Practices for RLS:
Clear Naming Conventions:
Use clear and descriptive names for roles, making it easy to understand their purpose and scope.
Keep it Simple:
Avoid overly complex DAX expressions for filtering data. Use simple and efficient expressions whenever possible to maintain performance.
Test Thoroughly:
Test RLS rules rigorously to ensure they accurately restrict data access as intended. Verify that users can only see the data they are authorized to access.
Document RLS Rules:
Document RLS rules and their rationale to ensure clarity for future reference and maintenance.
Regular Review:
Regularly review and update RLS rules as organizational requirements change or new data access scenarios arise.
Microsoft Documentation on RLS:
https://learn.microsoft.com/en-us/fabric/security/service-admin-rls
Conclusion:
In conclusion, Row-Level Security (RLS) is a powerful feature in Power BI that allows organizations to control data access at a granular level. By following best practices and leveraging additional resources, you can effectively implement RLS to enhance data security, comply with regulatory requirements, and provide a tailored user experience.