Creating, Attaching, and Resizing Block Volume in OCI
Introduction
In cloud computing environments, such as Oracle Cloud Infrastructure (OCI), block volumes play a pivotal role in providing scalable and persistent storage solutions for virtual machines (VMs) and applications. Creating, attaching, and resizing block volumes are fundamental operations that enable users to efficiently manage storage resources and adapt to changing workload demands.
Creating a Block Volume
When deploying a new VM or application, creating a block volume allows users to allocate dedicated storage resources. These block volumes act as virtual disks that can be attached to instances, providing a reliable and independent storage solution. Users can customize the size and performance characteristics of the block volume based on their specific requirements.
- Go to StorageàBlock Volume
- Click “Create Block Volume”
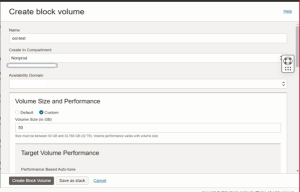
- Enter the Block Volume name.
- Select the Compartment where you need to create Block Volume.
- Select Availability Domain as same as the Instance you are going to attach.
- Select Volume Size from 50GB to 32TB.
- Click Create Block Volume.
Attaching block volume to an instance
When deploying a new VM or application, creating a block volume allows users to allocate dedicated storage resources. These block volumes act as virtual disks that can be attached to instances, providing a reliable and independent storage solution. Users can customize the size and performance characteristics of the block volume based on their specific requirements.
- Go to StorageàBlock Volumeà Click once-test Block Volume.
- Go to Resourcesà Attached Instance

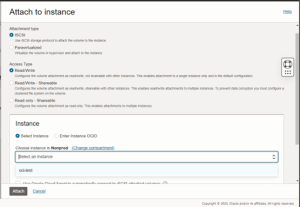
- Click Attach to Instance and fill in the following details
- Attachment type à ISCSI
- Access TypeàRead/Write
- Click Select InstanceàSelect the Instance CompartmentàSelect Instance
- Click “Attach”.
- Go to InstanceàResourcesàAttached block volumes
- Click the Menu option in the “oci-test” block volume.
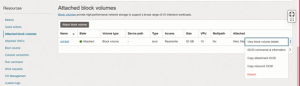
- Click iSCSI commands & information and copy those commands.
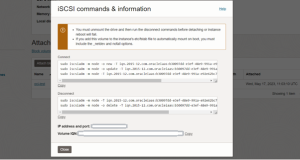
Note: mount command options will change according to Instance and block volume
- Login into the Instance and execute the above commands.
![]()
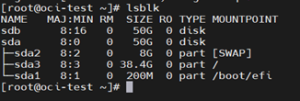
- Execute the “lsblk” command to verify the block volume attached.
Mounting the Block Volume in Linux:
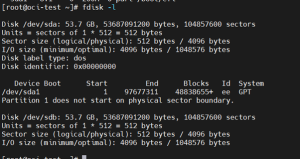
- Check the block volume using the below command
fdisk -l
- For creating the file system execute sudo mkfs.ext4 /dev/sdb
- Create a mount point directory.
- mkdir /mnt/testmount
- mount /dev/sdb1 /mnt/testmount
Resizing the Block Volume:
- Go to StorageàBlock VolumeàSelect “oci-test” block Volume
- Click “Edit”
- In the Volume Size field enter the required space need to increase
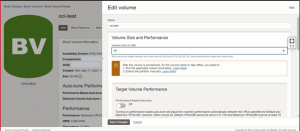
- Click Save Changes.
- It will pop up the Rescan commands like below.
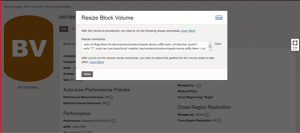
- Log in to the instance and execute the previous step commands.
Conclusion
In conclusion, the process of creating, attaching, and resizing block volumes in Oracle Cloud Infrastructure provides users with flexible and reliable storage solutions. These operations enable seamless scalability, data persistence, and high availability, supporting diverse workloads and ensuring an efficient and adaptable cloud storage environment.