Oracle GoldenGate Installation on Linux
Introduction
Oracle GoldenGate is a real-time data integration and replication tool that enables reliable, secure, and high-performance data movement across heterogeneous systems. It is widely used for real-time reporting, data synchronization, migrations, and high availability solutions. This document provides a step-by-step guide to installing Oracle GoldenGate Classic Architecture on a Linux environment.
Prerequisites
Before starting the installation, ensure the following prerequisites are met:
- Supported Linux operating system and architecture (64-bit)
- Oracle Database installed and running
- Proper OS user (for example, oracle) with required permissions
- Sufficient disk space for GoldenGate binaries and trail files
- Required OS packages and kernel parameters configured
- Oracle Inventory directory available or created
Installation Steps
Step 1: Download Oracle GoldenGate Software
- Download the appropriate Oracle GoldenGate Classic Architecture binaries from Oracle eDelivery.
- Verify the GoldenGate version is compatible with your Oracle Database version.
- Transfer the downloaded ZIP file to the target Linux server
Step 2: Create Directory Structure
- Log in as the Oracle software owner
- Create a base directory for GoldenGate installation.
Example:
mkdir -p /home/oracle/gg/classic
Ensure the directory has sufficient permissions and disk space.

Step 3: Unzip the GoldenGate Software
- Navigate to the directory where the ZIP file is copied.
- Unzip the GoldenGate software into the target directory.
Example:
unzip V1011472-01.zip -d /home/oracle/gg/classic
This will extract the GoldenGate shiphome and response files required for installation.
Step 4: Set Environment Variables
- Set the required environment variables for Oracle and GoldenGate.
Example:
export ORACLE_BASE=/u01/app/oracle
export ORACLE_HOME=/u01/app/oracle/product/19c/dbhome_1
export LD_LIBRARY_PATH=$ORACLE_HOME/lib
export PATH=$ORACLE_HOME/bin:$PATH
Verify the variables using the env command.
Step 5: Run the GoldenGate Installer
- Navigate to the installer directory:
cd /home/oracle/gg/classic/fbo_ggs_Linux_x64_Oracle_shiphome/Disk1
- Launch the installer:
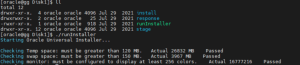
./runInstaller
- Follow the GUI or silent installation steps and provide required inputs
Step 6: Verify GoldenGate Installation
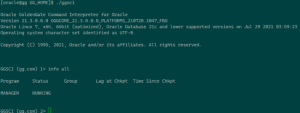
- Navigate to the GoldenGate home directory.
- Launch the GoldenGate Software Command Interface (GGSCI).
Example:
cd /u01/app/oracle/gg
./ggsci
- Verify installation by running:
GGSCI> info all
Conclusion
Oracle GoldenGate installation on Linux is a straightforward process when prerequisites are properly met. By following the steps outlined in this document, you can successfully install and validate GoldenGate Classic Architecture. After installation, proper configuration of database logging, users, and replication processes is essential to ensure reliable and real-time data replication. This setup forms the foundation for building robust data integration and high availability solutions using Oracle GoldenGate.