
Introduction / Issue
Organizations often need to migrate SQL Server databases from on-premises environments to Microsoft Azure SQL Database to leverage cloud-based features such as high availability, scalability, automated backups, and simplified database management. However, performing the migration correctly while ensuring data integrity and minimal downtime can be challenging without a structured deployment process. This blog explains how to deploy an existing SQL Server database to an Azure SQL Database using SQL Server Management Studio (SSMS).
Why We Need to Do / Cause of the Issue
As businesses move their workloads to the cloud, databases hosted on on-premises SQL Server instances also need to be migrated. Manual migration methods can be time-consuming and may introduce configuration errors or data inconsistencies.
Some common challenges include:
- Establishing secure connectivity between SQL Server and Azure SQL Server.
- Ensuring that the destination database is created with a unique name.
- Exporting and importing the database without data loss.
- Validating that the migrated database is successfully deployed and accessible.
- Reducing application downtime during migration.
Using the Deploy Database to Microsoft Azure SQL Database wizard in SSMS provides a guided approach that simplifies the migration process and minimizes the risk of errors.
How Do We Solve
Follow the steps below to deploy a SQL Server database to Microsoft Azure SQL Database.
Step 1: Launch the Deployment Wizard
- Open SQL Server Management Studio (SSMS).
- Connect to the SQL Server instance containing the database to be migrated.
- In Object Explorer, right-click the required database.
- Select:
Tasks → Deploy Database to Microsoft Azure SQL Database
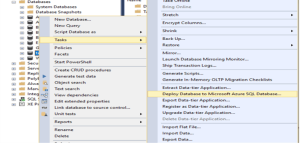
This will start the Deployment wizard by presenting the Introduction page:
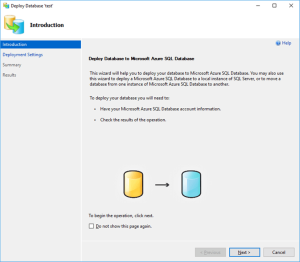
Click on the Next > button to provide the Deployment Settings:
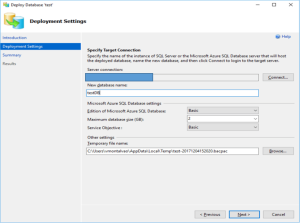
Step 2: Click on the Connect button to provide the credentials to connect to your SQL Azure server. Then provide the new database name. I will call this new database testDB.
You can use the suggested temporary file name and path or provide a new path and/or file name. In my case I will just accept the suggested one.
Click on the Next > button when you have provided all the necessary information for the deployment. Then confirm on the Summary page if the provided information is correct:
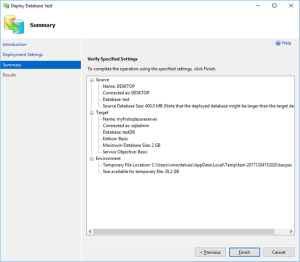
If it is all correct, click the Finish button to start the deployment of the database.
The deployment will show first the Export and then the Import processes. It will stop if any errors occur during these processes. When completed successfully, a screen similar to the following will be shown:
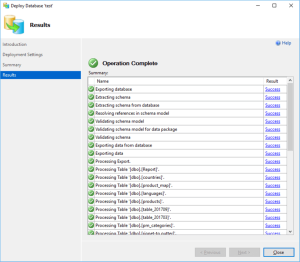
Click on the Close button to exit the Deploy database wizard.
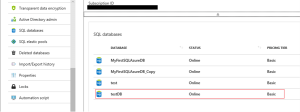
Step 3: Validate the New SQL Azure Database is Online
You can confirm now that the new database has been created in the SQL Azure server. In SSMS navigate to the SQL Azure instance:

And in the Microsoft Azure Portal validate by checking in the respective SQL Azure server:
CONCLUSION
Deploying a SQL Server database to Microsoft Azure SQL Database using SQL Server Management Studio provides a straightforward and reliable migration approach. By following the deployment wizard and validating the migrated database after completion, organizations can efficiently move their databases to Azure while ensuring data integrity and application readiness. Proper planning, validation, and adherence to best practices contribute to successful cloud database migration.
