Introduction/ Issue:
- When building business applications, it’s common to have dropdowns (Lists of Values) where the available options in one field depend on the selection in another. For example, in an HR application, a user might first select a Department, and then the Employeedropdown should automatically show only the employees belonging to that department.
- In Oracle Visual Builder Cloud Service (VBCS), creating simple LOVs is straightforward. However, when we want them to be cascading—that is, dynamically filtered based on another LOV—things get a little more complex. Without cascading behavior, the user experience suffers because all values are shown at once, forcing the user to sift through irrelevant options.
Why we need to do / Cause of the issue:
- By default, LOVs in VBCS don’t “talk” to each other. Each LOV pulls data independently, which means:
- Users might see all values, not just the relevant ones.
- The risk of selecting invalid or mismatched data
- The overall user experience becomes confusingand less efficient.
- This becomes a problem in real-world enterprise applications where data is hierarchical (Country → State → City, Department → Employees, Product Category → Products).
- To solve this, we need to implement cascading LOVs in VBCS, where the child LOV automatically refreshes and filters its data source based on the selected value in the parent LOV. This not only ensures data accuracy but also makes the UI more intuitive and user-friendly.
How do we solve:
- To implement cascading LOVs in VBCS, we need to establish a parent-child relationshipbetween the dropdowns, ensuring that the child LOV refreshes based on the selected value of the parent. This can be achieved using data providers and event–action chains.
- Here’s the high-level process:
- Create the Parent LOV
Creating the parent LOV involves two main steps:
-
- Adding the LOV item to the page.
- Attaching the dataset to that LOV item.
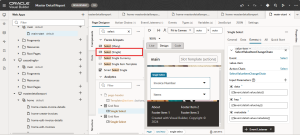
- To begin, drag and drop a Select (dropdown)component onto your page. Next, bind it to the parent dataset. This LOV will serve as the controlling field for the cascading behavior.
- Adding the LOV item is straightforward. From the Componentspanel, search for the Select item type. As shown in the screenshot, you’ll find the Select (Single) Simply drag and drop it into the Page Designer (middle section) to place it on your page.
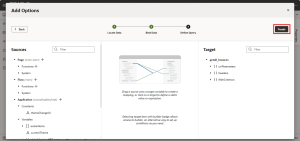
- Once the LOV item has been created, the next step is to attach a datasetto it. To do this, select the LOV component you added and navigate to the Properties Under the Quick Start section, click on Add Options.
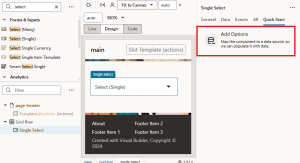
- This opens a dialog wizard with three configuration steps:
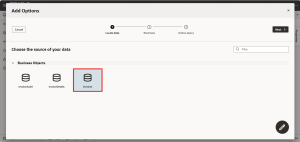
- Select a Business Object– Choose the data source for your LOV. (For example, here we’ll use the Invoices Business Object.)
-
- Pick a Label and Value– From the list of available columns displayed on the left, select one to act as the display label (shown to users) and another as the underlying value.
-
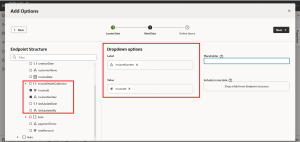
- Add a Filter (Optional) – If you need to restrict the data, you can apply filter conditions here. In our case, no filter is needed, so we’ll skip this step.
- Add a Filter (Optional) – If you need to restrict the data, you can apply filter conditions here. In our case, no filter is needed, so we’ll skip this step.
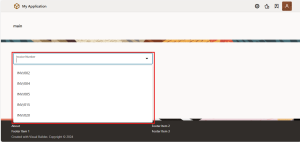
- Finally, click Finish. The LOV item is now fully configured with its dataset.If we switch to the Application UI at this stage, we’ll see the LOV displaying a list of invoices that have already been generated, as shown in the screenshot.
- Create the Child LOV:
- Creating the child LOV involves the same set steps similar to the parent LOV:
-
- Add another Selectcomponent to your page to serve as the child LOV.
- Bind it to the corresponding data-set.
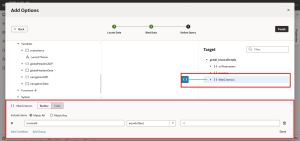
- The process for creating the child LOV is similar to the parent LOV, with one key difference: you’ll need to add a filter conditionwhen attaching the dataset (Step 3 of the Add Options wizard).
- As shown in the screenshot, you can define the filter at the bottom of the configuration dialog. To prevent the child LOV from showing data initially, set the filterCriterion variableto -1. This ensures that no values are returned until the parent LOV drives the filtering logic.
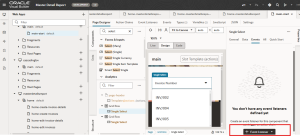
3. Link Parent to Child via Event–Action Chain:
- Linking Parent to Child via Event–Action Chain involves three main steps:
- Select the parent LOVand create an Action Chain for its Value Change
- In the Action Chain, set the filterCriterion parameterof the child LOV’s data provider using the selected parent value.
- Finally, trigger a Refreshaction on the child LOV to reload its data.
- In our case, the child LOV’s data provider is invoiceDetailsListSDP, and its filter parameter is filterCriterion.
To achieve the cascading effect:- Create an event listener on the parent LOV that triggers whenever the user selects a value.
-
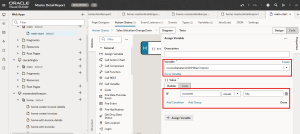
- When the event is triggered, we will perform an action that assigns a value to the filterCriterionvariable of the items LOV.

-
- Assign the selected invoice ID from the parent LOV to invoiceDetailsListSDP.filterCriterion.
-
- This automatically refreshes the child LOV so it only fetches and displays the items related to the selected invoice.
- The result: users see only the relevant records in the child LOV, dynamically filtered based on their parent selection.
Conclusion:
- Cascading LOVs in VBCS not only simplify data selection but also create a cleaner, more intuitive user experience. Instead of overwhelming users with large, unfiltered lists, the child LOV dynamically updates based on the parent’s selection, ensuring that only relevant data is displayed.
- By following the simple steps of creating parent and child LOVs, binding datasets, applying filters, and linking them through event–action chains, we can deliver a highly interactive and user-friendly UI.
- This approach reduces user errors, improves efficiency, and gives your applications a polished, professional feel—something every modern business application should aim for.
Recent Posts