Getting Started with ALM Toolkit for Power BI
INTRODUCTION
There are several ways to replace the flooring in your kitchen, but if you were on a budget and had to choose between modifying the existing kitchen floor or building an entirely new house, the only difference being the kitchen floor, you would probably choose the first option. When making changes to a Power BI Dataset, you can have a similar experience. When making changes to large, complex datasets, you can either republish entire Datasets or modify the existing dataset and push only the differences up to the Power BI Service.
In this blog, we will explore a tool called ALM Toolkit that makes this possible. We will cover what ALM Toolkit does, why it’s important for shared datasets, and how to use it to make changes to your Power BI Datasets.
The ALM Toolkit (Application Lifecycle Management Toolkit) is a popular external tool designed to assist Power BI users with the management and deployment of datasets, particularly in scenarios that involve version control, comparing datasets, and merging changes. It’s widely used in scenarios where complex Power BI models require continuous updates, and teams need a robust method for tracking changes and automating deployment processes.
Key features of the ALM Toolkit include:
- Dataset Comparison: It allows users to compare two Power BI datasets or models. This is particularly useful in development and production environments, where you want to ensure changes between different versions of datasets are accurately reflected.
- Schema and Model Deployment: ALM Toolkit provides the ability to deploy model changes from one environment (such as development) to another (like production). You can selectively apply schema changes, avoiding the need to redeploy entire datasets.
- Version Control Integration: By integrating with source control platforms like Azure DevOps and Git, it helps track and manage changes over time, making collaboration easier in team-based development environments.
- Merging Changes: In scenarios where multiple developers are working on the same Power BI model, ALM Toolkit facilitates the merging of their changes, ensuring no loss of work or conflicting updates.
- Advanced Scripting Support: It offers support for advanced scripting, which can help automate repetitive tasks such as deployments or version control.
- Handling Power BI Premium Features: It works well with Power BI Premium and Power BI Embedded, particularly for larger datasets and more complex models, ensuring smooth handling of advanced features.
It’s a useful tool for managing Power BI projects, especially when working with deployment pipelines and multiple environments, making it easier to handle model lifecycle, development, and changes efficiently.
Why we need to do / Cause of the issue
ALM Toolkit for Power BI is a third-party tool that modifies the model files for Power BI Datasets, Template, and BIM files and allows for changes to be made to existing Datasets published in Power BI Service on Premium or Premium Per User (PPU) workspaces.
This means transferring the model and data from your desktop to Power BI Service. You can update the model and kick off a refresh in Power BI Service, meaning less attended time, less watching to make sure your large datasets publish to Power BI Service, less strain on your PC, and moving on to the next task a few minutes quicker.
This is especially important when working with enterprise datasets and Power BI Deployment Pipelines. These large datasets can take 10 minutes or more to deploy with Power BI Desktop, but ALM Toolkit can merge changes in under a minute using the same dataset, all while having minimal strains on your PC memory and CPU.
How do we solve
To get started with ALM Toolkit for Power BI, you will need the following:
- ALM Toolkit for Power BI – available for free here
- Power BI Desktop
1. A Power BI Pro License and a Workspace on a Premium Capacity
2.A Power BI PPU License and a PPU Workspace and Power BI Dataset with one or more data sources, published to Power BI Service on a Premium or PPU Workspace
We will walk through an example of adding and deleting a data source and updating fields in a data source, but first, we need to configure the ALM Toolkit. Note that XLMA Read/Write permissions must be enabled on the capacity before connecting with the ALM Toolkit.
Additionally, once a dataset is published using XLMA, it cannot be downloaded from Power BI Service, so be sure to have a spare copy saved (if you republish from Power BI Desktop, this limitation goes away.
- Open the Power BI file in Power BI Desktop, and ensure it is published to a Premium or PPU Workspace.
- You can tell if this workspace is Premium or PPU by finding the gem icon next to the workspace name.
- Navigate to the Premium or PPU Workspace and open the Workspace Settings
- Open the PremiumTab and identify the Workspace Connection at the bottom of the screen. Copy this by clicking the clipboard icon in the bottom right corner.
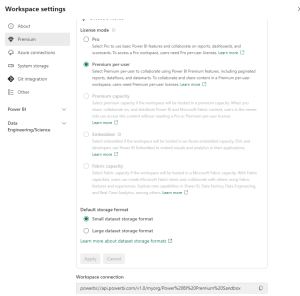
Note: The URL will be powerbi://api.powerbi.com/v1.0/myorg/ followed by the Workspace name, substituting %20 for spaces in the name.
5. Open ALM Toolkit. The Connections Pane will pop up automatically.
6. Ensure your Source is selected as Power BI Desktop and the correct Power BI dataset is available in the drop-down. 
7.Paste the copied URL into the Workspace box in the Target Section.
8.Using the dropdown on the Dataset option in theTarget Section will begin an authentication process. Log in using your Microsoft Account Credentials to allow for access to Power BI Service.
9.Once authentication is complete, select the appropriate dataset from the dropdown.
10.Select OK to begin the comparison of the Desktop and Service models.
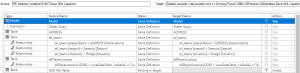
11.Review the comparison
12. You will see the Source Model components on the left and, on the right, the Target Model components. In between, you will see a status that shows if the source component exists in the target, is missing from the target, is missing from the source, or has a different definition in the target from the source.
13.Using the Select Actions dropdown, you can filter the display to show several options, but you’re mostly going to Hide Skip objects with the same definition. This will show only the differences between the two models.
We will navigate back to Power BI to create a new table to see how this appears in the ALM Toolkit.
Note: if you keep the ALM Toolkit program open during this, your authentication should persist, and you won’t have to re-authenticate.
- In Power BI, go to Get data > Blank Query. This will navigate to Power Query, where you can name this query as you please.
- Hit Close and Apply, Save the File, and Navigate back to ALM Toolkit.
- Go to Compare in the Top Left, and select OK to refresh the comparison.
- Notice the ALM Test Table in the Source Table that is missing from the target, and we will push this file to Power BI Service. Ensure the Action Column has Create Selected.
- Under the Select ActionsTab, you have several options to filter or unfilter the fields that may be updated, skipped, added, or deleted in the update to the target. Be sure to review all changes. I usually start by selecting Hide skip objects with the same definitions, which allows me only to view objects that will change when I update the target.
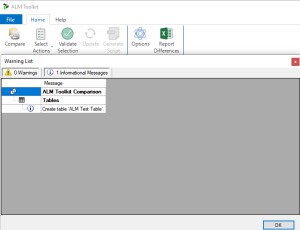
- Select Validate Selection, and a list of all changes, warnings, and potential errors will appear. Warnings and Errors can come when you attempt to update a Power BI Desktop File. More details will be provided in the limitations section later on.
- Select OKand Hit Update to push the changes to the Power BI Server.
- When you refresh the comparison, you will see that all objects have the same definition again.
Updating and deleting objects with ALM toolkits has the same steps, so we will instead look at the comparison screens for both options:
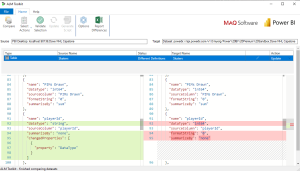
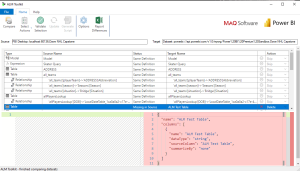
Updating an object using ALM Toolkit
When an object has the same name but different definitions, you will see an Update action assigned to make the target match the source. The above image shows where a field, formerly a whole number field, has been changed to a string field.
In the comparison pane on the bottom, the scroll bars will have green sections indicating where the source contains sections different from the target and will be inserted into the target. Red sections where the target contains sections different from the source will be removed from the target upon updating.
Deleting an object using ALM Toolkit
When the object is present in the target but missing in the source, the default option will be set to delete to make the target dataset match the source. Ensure you don’t want to delete tables extensively before making this change, as they may take a lot of work to recover.
Deployments and Release Management
So, you built that new kitchen, but now you hate it. The sink is installed on the wrong side of the counter, and all cabinet doors open vertically. How do you go about reverting changes? After running a comparison, you can go to File > Save As in ALM Toolkit to save the comparison. However, you need help maintaining the PBIX or PBIT file version history.
To make sure that your Power BI changes can be reverted by more than memory, utilize tools like SharePoint folders, which maintain a version history of files that allow for historical files to be retrieved after they have been overwritten, or establish a folder system where your Power BI Desktop files live, and save versions of the model file in a folder whenever changes are made.
Tips and Reminders for ALM Toolkit for Power BI
- ALM Toolkit has some limitations – while you can run a comparison with a Power BI Desktop file as the ‘target’ file, most changes cannot be made to a Power BI Desktop or Template file through ALM Toolkit. Power BI has limitations to these files. Forcing changes to the model can break these files. You will receive a warning preventing you from making changes unless a setting is checked otherwise. Don’t burn down your newly renovated house without saving a copy elsewhere first.
- Once a Power BI Dataset in Power BI Service has been altered using the XMLA endpoint, the dataset can no longer be downloaded from Power BI Service. While you’re learning the tool, make sure to keep copies of the original files saved separately.
- Because of the above limitations, best practices state you should save copies of the file before committing any changes to Power BI Service.
- After you push a change to a Power BI Dataset using an import model that alters the tables’ structure, kick off a refresh to load appropriate data into the dataset.
- You don’t need to use PBIX files as the source! You can use datasets that are already in Power BI Service, BIM files saved from SSRS or Tabular Editor, or Power BI Template files!
LIMITATIONS: –
- Limited to Tabular Models
- The ALM Toolkit is primarily designed for Power BI and Azure Analysis Services tabular models. It doesn’t support multi-dimensional models or non-Analysis Services sources, limiting its use to environments using these specific model types.
2. No Direct Integration with Power BI Service
- While ALM Toolkit allows you to compare and deploy datasets, it doesn’t have built-in direct integration with Power BI Service for automatic deployment or managing report-level objects (like visuals, reports, and dashboards). It’s mainly focused on managing dataset schema and metadata.
3. No Support for Full CI/CD Pipelines
- ALM Toolkit assists with deployment processes, but it doesn’t provide complete automation for Continuous Integration/Continuous Deployment (CI/CD). Teams often use other tools (such as Azure DevOps) to set up fully automated pipelines.
4. Manual Operations
- Many of the tasks, such as comparison, schema deployment, and merging, still require manual intervention. It’s not a fully automated solution, and significant manual effort is needed to manage the lifecycle.
5. Complex Merges
- While ALM Toolkit provides the ability to merge changes between datasets, the merge process can become complex in large, team-based development environments. Conflicts may arise when multiple team members work on the same model parts, requiring careful manual handling.
6. No Change History
- ALM Toolkit doesn’t inherently track the history of changes. You need to integrate it with an external version control system, such as Git or TFVC, to manage change history. Without proper integration, it’s challenging to audit who made changes and when.
7. DAX and Measure Handling
- The ALM Toolkit primarily focuses on schema changes. While it can handle DAX and measures, complex changes involving DAX expressions may not always be easy to manage or compare, requiring additional manual review.
8. No Report-Level Version Control
- The ALM Toolkit only works with dataset objects (such as tables, relationships, and measures) and does not provide version control for the layout or visuals of Power BI reports themselves. This can make it harder to track changes to report design or user interface elements.
9. Limited Error Handling
- The toolkit’s error handling, especially for schema mismatches or deployment failures, can be somewhat limited. It may not provide detailed information about why deployments fail, requiring more troubleshooting effort.
10. Dependencies on External Tools
- For full version control and collaboration, ALM Toolkit needs to be paired with external version control systems (Git, Azure DevOps, etc.). It doesn’t offer an all-in-one solution, and this adds complexity to the setup and maintenance of version control practices.
11. Learning Curve
- Users need to have a good understanding of Power BI models and ALM processes, including version control principles, to effectively use the toolkit. For teams new to ALM or Power BI, there is a learning curve to get the full benefits.
CONCLUSION:
ALM Toolkit for Power BI is a great, free tool to add to your Power BI environment. You can make iterative changes to enterprise datasets and troubleshoot any issues that may arrive in the development lifecycle, all while freeing up your computer from being locked down and pushing large volumes of data up to Power BI Service.