How to load Chart of Accounts Mapping
Introduction:
This can be used as a reference document while we do the chart of accounts mapping. You can define chart of accounts mappings on the Manage Chart of Accounts Mapping page. This page centralizes all the related elements of managing mappings with segment rules and provides tools for creating and editing a large volume of rollup rules. In this document, it is presented how to manage changes in COA mappings in Oracle Fusion Cloud.
Why we need to do /cause of the issue:
In General scenario where we have primary and secondary ledgers and both are having different chart of accounts instance with different segments, then we need to have a mapping between Source to Target. Which means, whenever any account/segment value is being added we also need to do a mapping between two instances, else while we do the accounting transaction will struck with an accounting issue and we wont be able to do accounting for the same.. This would be a regular on going activity as and when changes are placed in, it has to be uploaded to the application to avoid accounting issues and also for smooth books closure.
How do we Upload:
We will use the below steps to upload the chart of accounts mapping to the application
Step 1: Save the GlCoaMapSegmentRollupRules.zip file sent by the user, to a local folder.
Step 2: Access the Oracle Fusion instance;
Step 3: In the Setup and Maintenance work area, go to the Manage Chart of Accounts Mappings task.
- Offering: Financials
- Functional Area: Financial Reporting Structures

Step 4: On the Actions menu, select Upload Rules.

Step 5: In the Upload dialog box, select the file you saved in step 1 and click Submit to launch the Load Interface File for Import process.

Step 6: If the process ends in error or warning:
- Review the log and output files for details about the rows that caused the failure.
- Send the error to the user for corretion.
- Repeat steps 1 through 5 until the errors are resolved.
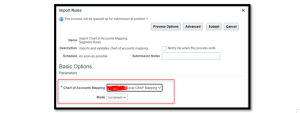
Step 7: On the Actions menu, select Import Rules.

Step 8: In the Chart of Accounts Mapping field, select the applicable chart of accounts mapping. The list of values displays the names of all chart of accounts mappings in the interface table. Select Increment when you’re uploading changes to existing chart of accounts mapping rules.

Step 9: Go to Tools àScheduled Processes and review the txt output

Conclusion:
By uploading this chart of accounts mapping we can avoid issues and we can have smooth accounting for the smooth books closure and also we can avoid wrong accounting if we had corrected the mappings..
