Steps to Patch MySQL Server
Introduction
Patching your MySQL server is essential to maintain security, stability, and performance. This guide will walk you through the necessary steps to apply updates effectively. We’ll cover pre-patch preparation, the patching process, and post-patch verification to ensure a smooth upgrade. Follow these steps carefully to keep your MySQL server running optimally.
To patch MySQL, you generally need to follow these steps:
Backup:
Before applying any patches or updates, it’s essential to create a backup of your MySQL database and configuration. This ensures that you can revert to a previous state in case anything goes wrong during the patching process.
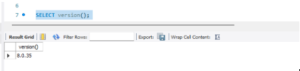
Check Current Version:
Verify the current version of MySQL that is running on your system. You can do this by connecting to the MySQL server and executing the following SQL query:
SELECT version();
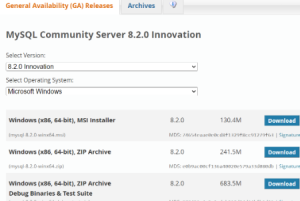
Download the Patch:
https://dev.mysql.com/downloads/mysql/
Visit the official MySQL website or your distribution’s package repository to obtain the latest patches or updates. Download the appropriate package for your operating system.
Review Release Notes:
Read the release notes associated with the patch. This documentation typically includes information about new features, bug fixes, and any changes that might affect your system.
Stop MySQL Server:
Before applying the patch, stop the MySQL server to prevent any conflicts during the update. The process for stopping the MySQL server varies depending on your operating system:
On Windows:
Use the Services application or stop the MySQL service through the MySQL Workbench.
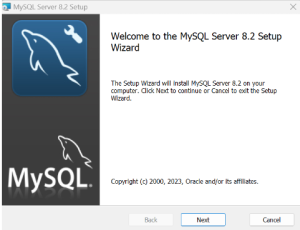
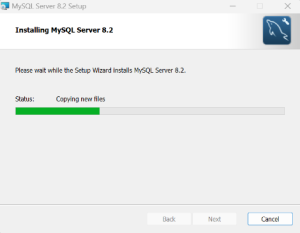
Apply the Patch:
The method for applying the patch depends on the type of patch you’ve downloaded:
Binary Installation:
Follow below steps for Binary Installation:
Extract the Binary Package:
- Extract the downloaded binary package to a temporary directory using a tool like WinRAR or 7-Zip.
- Copy the contents of the `bin` directory from the extracted package to your MySQL installation directory (e.g., `C:\Program Files\MySQL\MySQL Server 8.0\’), replacing the old binaries.
Replace Existing Binary Files:
- Carefully replace the existing MySQL binary files with the new ones from the extracted package.
- Make sure to keep your original configuration file (`my.ini`).
Run MySQL Upgrade:
- Open the Command Prompt and navigate to the MySQL ‘bin’ directory (e.g., ‘cd C:\Program Files\MySQL\MySQL Server 8.0\bin’).
- Run ‘mysql_upgrade’ to update the system tables and ensure compatibility with the new binaries.
Restart the MySQL Server:
- Start the MySQL server to apply the changes.
- Use the Command Prompt to run: `net start MySQL` or start the service via the Windows Services Manager.
Verify the Installation:
- Check the MySQL version to ensure the update was successful by running ‘mysql –version’ in the Command Prompt.
- Review the MySQL logs to ensure the server is running without errors.
Perform Post-Patch Testing:
- Test your databases and applications to confirm that everything is functioning correctly after the patch.
- Check for any errors or irregularities.
Manual Installation:
Follow below steps for Manual Installation:
Extract the Binary Package:
- Extract the downloaded binary package to a temporary directory using a tool like WinRAR or 7-Zip.
- Copy the contents of the `bin` directory from the extracted package to your MySQL installation directory (e.g., `C:\Program Files\MySQL\MySQL Server 8.0\’), replacing the old binaries.
Replace Existing Binary Files:
- Carefully replace the existing MySQL binary files with the new ones from the extracted package.
- Make sure to keep your original configuration file (`my.ini`).
Move the New Files:
- Move the extracted files from the temporary location to the original MySQL installation directory (e.g., `C:\Program Files\MySQL\MySQL Server 8.0\`).
- Ensure all files and folders from the new version are in the correct location.
Copy Configuration and Data Files:
- Copy your original `my.ini` configuration file from the old installation directory (`MySQL Server 8.0.old`) to the new installation directory.
- Also, copy the `data` directory from the old installation to the new one if it wasn’t moved during the extraction.
Run MySQL Upgrade:
- Open the Command Prompt and navigate to the MySQL `bin` directory (e.g., `cd C:\Program Files\MySQL\MySQL Server 8.0\bin`).
- Run `mysql_upgrade` to update the system tables and ensure they are compatible with the new version.
Restart the MySQL Server:
- Start the MySQL server with the updated binaries.
- Use the Command Prompt to run: `net start MySQL` or start the service via the Windows Services Manager.
Verify the Installation:
- Check the MySQL version to ensure the update was successful by running ‘mysql –version’ in the Command Prompt.
- Review the MySQL logs to ensure the server is running without errors.
Perform Post-Patch Testing:
- Test your databases and applications to confirm that everything is working as expected after the update.
- Look for any errors or issues that may have arisen during the patching process.
Test Your Application:
Thoroughly test your applications to ensure they are working correctly with the updated MySQL version.
Conclusion:
By following these steps, your MySQL server should now be securely and efficiently updated. This patch enhances the performance and protects your database from potential vulnerabilities. Regular maintenance like this ensures the longevity and reliability of your system. Always stay proactive with updates to keep your services running smoothly.