
Introduction/ Issue:
Interactive Reports (IR) are one of the most commonly used components in Oracle APEX applications, giving users an easy way to search, filter, sort, and export data. With Oracle APEX 26.1, several useful enhancements have been introduced to make Interactive Reports easier to configure and more flexible for developers and end users. In this blog, we’ll take a simple walk through of the key Interactive Report enhancements in APEX 26.1, where to find them in Page Designer, how they work, and how they can be useful in real-world applications.
Five small attributes, zero JavaScript, one much smarter Interactive Report.
1. Declarative Row Selection
Until now, letting users select multiple rows in an Interactive Report (for bulk approvals, batch updates, multi-row exports, etc.) meant writing custom JavaScript against the IR’s internal APIs. APEX 26.1 makes this a built-in, no-code feature.
Three new attributes show up under the Row Selector column in Page Designer:
| Attribute | What it does |
| Enable Multi Select | Turns on row selection and shows a checkbox per row. Must be enabled before anything else works. |
| Show Select All | Adds a header checkbox to select/deselect all visible rows at once. Only active when Multi Select is on. |
| Hide Control | Hides the checkbox column while keeping selection active — handy if you’re driving selection entirely through JavaScript. |
There’s also a Current Selection Page Item setting — bind it to something like P1_SELECTED_IDS and APEX keeps that item populated with a colon-delimited list of selected primary keys, ready for a Dynamic Action or page process to consume.
Setting it up:
- Open the page in Page Designer and select the Interactive Report region.
- Right-click Columns→ Create Row Selector. This instantly wires up the three new attributes.
- Set Enable Multi Selectto Yes.
- Set Show Select Allto Yes if you want the header-level “select all” checkbox.
- Leave Hide Controlas No unless you’re managing selection purely through JavaScript.
- Point Current Selection Page Itemat a page item, e.g. P1_SELECTED_IDS.
- Add a Trigger Action on the Selection Change [Region]event to react whenever the selection changes.
- Save and run.
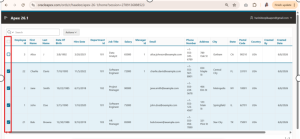
If you do go the JavaScript route with Hide Control, the region’s JS API exposes getSelectedValues(), setSelectedValues(), and selectAll().
2. More Efficient Report Rendering
This one needs zero configuration. Interactive Reports now render using a more efficient internal approach, which removes the old 32K row-output limit. Reports with many columns, long text values, or heavier templates now have far more headroom before they hit a ceiling.
Existing reports pick this up automatically — no migration, no flag to flip.
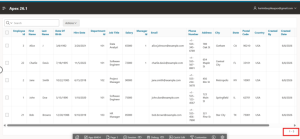
3. A Better Way to Limit Displayed Rows: Maximum Rows to Display
Previously, the only lever for capping row counts was Maximum Rows to Process, which trims the dataset before filters and sorting are applied — meaning a filtered report could end up showing fewer rows than expected, or an aggregate could be computed on a partial set.
APEX 26.1 adds Maximum Rows to Display, a new pagination property that caps rows after all filtering, sorting, and report logic has already run. The two properties are mutually exclusive — setting one clears the other — and Oracle recommends the new property as the default choice for large datasets, since it always reflects the fully processed result.
Setting it up:
- In Page Designer, select the Interactive Report region.
- In the Attributes panel, scroll to Pagination.
- Set Maximum Rows to Displayto your desired cap.
- Save and run.
A simple mental model: Maximum Rows to Process is an upstream limit on raw data; Maximum Rows to Display is a downstream limit on what the user actually sees.
4. Column-Level CSS Classes
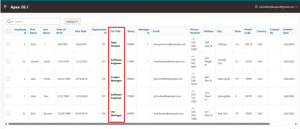
Interactive Report columns can now carry CSS classes directly, rendered on the <td> element at runtime. This closes a long-standing gap with Interactive Grid and Classic Reports, which already supported this.
The attribute supports substitution strings, so the class applied to a cell can be computed dynamically per row — from a column value, a page item, an application item, or a system variable. That opens up patterns like status badges, conditional highlighting, or styling driven entirely by page state, without a single HTML expression or custom stylesheet.
Setting it up:
- In Page Designer, click the column you want to style.
- Under Appearance, find the new CSS Classes
- Enter a built-in utility class (e.g. u-color-18, u-bold) — or several, space-separated.
- For dynamic styling, use a substitution string such as &STATUS_CLASS., resolved per row at runtime.
5. Open Interactive Report Dialogs from Custom Controls
Previously, every IR dialog (Filter, Highlight, Chart, Download, Save Report, Select Columns, etc.) lived behind the standard Actions menu. APEX 26.1 introduces a new Trigger Action called Invoke Interactive Report Dialog that lets you open any of these dialogs from a button, icon, or other control — placed wherever it makes sense in your layout.
Think: a dedicated download icon, a “Select Columns” button pinned to your toolbar, or a custom menu grouping just the dialogs your users actually need.
Setting it up:
Step 1 — Create the menu button
- Right-click the IR region and add a Button, with Slotset to Right of Interactive Report Search Bar.
- Give it a label (e.g. “Custom Actions”), a Text-with-Icon template, and an icon like fa-angle-down.
- Under Behavior, set Typeto Menu.
Step 2 — Add menu entries
- Add a menu entry per dialog you want exposed (Highlight, Chart, Download, Save Report…).
- Set each entry’s Behavior Typeto Trigger Action.
Step 3 — Wire up the action
- Under each menu entry, add a Triggered Action with Actionset to Invoke Interactive Report Dialog.
- Under Settings, choose which dialog this entry opens (e.g. Download).
- Under Affected Elements, set Selection Typeto Region and point it at your IR region.
- Repeat for each entry, save, and run.
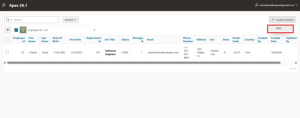
Each menu entry is independently wired, so you get full control over exactly which IR controls are surfaced and in what order.
Conclusion:
None of these five changes are flashy on their own, but together they remove a lot of the custom JavaScript and workarounds that APEX developers have quietly maintained for years:
- Row selection— no more hand-rolled checkbox logic
- Rendering improvements— automatic, no 32K ceiling
- Maximum Rows to Display— correct row counts after filtering
- Column CSS Classes— no more HTML expressions for styling
- Invoke IR Dialog— dialogs available outside the Actions menu
