Description:
- Flex Diskgroups are the new features in oracle 12c R2 for quotas, cloning and filegroups.
- Oracle ASM provides two-way mirroring by default for newly-created flex disk groups.
- We can migrate a NORMAL and HIGH redundancy diskgroup to FLEX Redundancy diskgroup.
- For migrated flex disk groups, the default values are obtained from the template values in the normal or high redundancy disk groups before migration.
- For migration from normal redundancy, if the template defaults were not changed, then the flex defaults are two-way mirroring.
- For migration from high redundancy, if the template defaults were not changed, then the flex defaults are three-way mirroring.
Note : We cannot migrate an EXTERNAL redundancy diskgroup to a FLEX redundancy disk group.
ASM Mirroring:
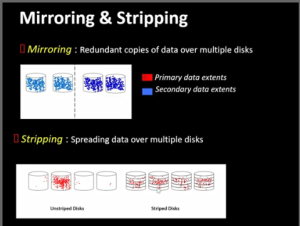
Maintaining identical copies of data on one or more disks. Typically, mirroring is performed on duplicate hard disks at the operating system level, so that if one of the disks becomes unavailable, the other disk can continue to service requests without interruptions.
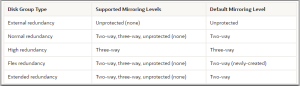
Mirroring options for Oracle ASM disk group types
ASM Disks:
Disk groups are created using the CREATE DISKGROUP statement. This statement allows you to specify the level of redundancy:
- NORMAL REDUNDANCY- Two-way mirroring, requiring two failure groups.
- HIGH REDUNDANCY- Three-way mirroring, requiring three failure groups.
- EXTERNAL REDUNDANCY- No mirroring for disks that are already protected using hardware mirroring or RAID. If you have hardware RAID it should be used in preference to ASM redundancy, so this will be the standard option for most installations.
Now we are migrate a normal redundancy disk group to flex redundancy
Step 1: Check the migrating diskgroup redundancy
select GROUP_NUMBER,NAME,STATE,TYPE from v$asm_diskgroup where name=’DISKPROD’;
![]()
Step 2: Check all the disks has been created or not in DISKPROD because we need to migrate for three disks available in Flex redundancy.
set lines 1000
col DISK_FILE_PATH for a40
SELECT NVL(a.name, ‘[CANDIDATE]’) disk_group_name
2 , b.path disk_file_path
3 , b.name disk_file_name
4 , b.failgroup disk_file_fail_group
5 FROM v$asm_diskgroup a RIGHT OUTER JOIN v$asm_disk b USING (group_number) where a.name=’DISKPROD’ ORDER BY a.name;
We have to dismount and mount the diskgroup for migrating the diskgroup for that we are shutting down all the databases running on the disks.
Step 3:Stop the database running on the disk group for migrating the diskgroup.
[oracle@inba ~]$ srvctl stop database -d ora12c
[oracle@inba ~]$ srvctl status database -d ora12c
Database is not running.
Step 4 : Check the databases are located in the Disk group
[oracle@inba ~]$ srvctl config database -d ora12c
Database unique name: ora12c
Database name: ora12c
Oracle home: /u01/app/oracle/product/12.2.0.1/dbhome_1
Oracle user: oracle
Spfile: +DATA/ora12c/PARAMETERFILE/spfile.270.1070880221
Password file:
Domain:
Start options: open
Stop options: immediate
Database role: PRIMARY
Management policy: AUTOMATIC
Disk Groups: DATA
Services: ora12cdb
OSDBA group:
OSOPER group:
Database instance: ora12c
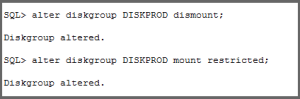
Step 5 : Mount the diskgroup in restricted mode
alter diskgroup DISKPROD dismount;
alter diskgroup DISKPROD mount restricted;
Step 6: ASM operation requires compatible.asm and compatible.rdbms of 12.2.0.0.0 or higher so we need to set asm_attribute value.
SQL> ALTER DISKGROUP DISKPROD CONVERT REDUNDANCY TO FLEX;
ALTER DISKGROUP DISKPROD CONVERT REDUNDANCY TO FLEX
*ERROR at line 1:
ORA-15032: not all alterations performed
ORA-15221: ASM operation requires compatible.asm of 12.2.0.0.0 or higher
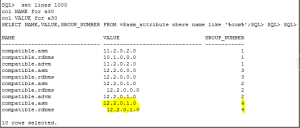
SQL> set lines 1000
col NAME for a30
col VALUE for a30
SELECT NAME,VALUE,GROUP_NUMBER FROM v$asm_attribute where name like ‘%com%’;
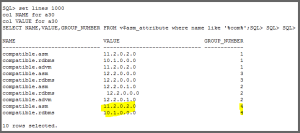
alter diskgroup DISKPROD set attribute ‘compatible.asm’=’ 12.2.0.1.0′;
![]()
alter diskgroup DISKPROD set attribute ‘compatible.rdbms’=’ 12.2.0.1.0′;
![]()
Step 7 : Now we can convert the diskgroup to flex
ALTER DISKGROUP DISKPROD CONVERT REDUNDANCY TO FLEX;
![]()
Step 8 : Check the status of diskgroup is converted to flex redundancy.
select GROUP_NUMBER,NAME,STATE,TYPE from v$asm_diskgroup where name=’DISKPROD’;
![]()
Step 9 : Now dismount and mount the diskgroup & Check the state and redundancy type.
alter diskgroup DISKPROD dismount;
alter diskgroup DISKPROD mount;
select GROUP_NUMBER,NAME,STATE,TYPE from v$asm_diskgroup where name=’DISKPROD’;
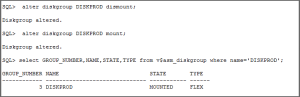
We have successfully Migrating a Normal disk group to flex disk group.