Video Recording in Oracle APEX
Introduction:-
Oracle APEX allows seamless integration of modern web technologies to enhance application capabilities. This document explains how to implement client-side video recording in Oracle APEX using JavaScript and browser Media APIs. The solution enables users to record video directly from the browser, preview it, retry if required, and securely save the recording into the database.
The following technologies are used to achieve this solution:
- Oracle APEX
- JavaScript (MediaRecorder API)
- HTML,CSS
- AJAX Callback (PL/SQL)
Why We Need to Do This?
1.Capture Real-Time User Evidence:-
Certain business processes require live video capture instead of file uploads to ensure authenticity and prevent misuse.
2.Improve User Experience:-
Users can record, preview, retry, and submit videos directly within the application without using external tools.
3.Secure and Controlled Storage:-
Videos are stored securely as BLOBs in the database with proper metadata such as filename, duration, and MIME type.
4.Reduce Dependency on Third-Party Tools:-
The entire implementation relies on native browser and Oracle APEX capabilities, avoiding external services.
5.Support Compliance and Audit Requirements:-
Video recordings can be used as verifiable proof for audits, compliance checks, and validations.
How Do We Solve It?
Below are the step-by-step instructions to implement video recording in Oracle APEX.
Step 1: Create a Static Content Region:-
Create a Static Content region and add HTML markup to display the video preview area, recorded video section, control buttons (Start, Stop, Save, Retry), and status messages.
HTML Code
<div id="recorderUI" class="t-Form--stretchInputs">
 <div id="previewCard" class="video-card">
     <div class="card">
    <label class="t-Form-label">Preview</label>
                  <div class="video-player">
      <video id="preview" playsinline autoplay muted></video>
   </div> </div>
</div>

<div id="recordedCard" class="video-card" style="display:none;">
 <div class="card">
 <label class="t-Form-label">Recorded Clip</label>
 <div class="video-player">
 <video id="playback" controls></video>
  </div></div>
</div>


<div id="recordButtons" class="t-ButtonRegion t-ButtonRegion--noBorder">
  <button id="btnStart" type="button" class="t-Button t-Button--hot">Start</button>
     <button id="btnStop"  type="button" class="t-Button" disabled>Stop</button>
 <span id="timer" style="font-weight:600;margin-left:12px;"></span>
 </div>

 <div id="postButtons" class="t-ButtonRegion t-ButtonRegion--noBorder" style="display:none;">
  <button id="btnSave"  type="button" class="t-Button t-Button--primary">Save</button>
  <button id="btnRetry" type="button" class="t-Button t-Button--danger">Retry</button>
 </div>

 <div id="status" class="u-success-text" style="margin-top:8px;"></div>
</div>
Step 2: Add JavaScript for Camera Access and Recording in Function and Gloabal Declaration
Use the navigator.mediaDevices.getUserMedia API to access the
camera and microphone. The MediaRecorder API is used to start and
stop video recording while capturing video chunks.
Javascript Code
(function () {
 // Elements
const preview      = document.getElementById('preview');
const playback     = document.getElementById('playback');
const previewCard  = document.getElementById('previewCard');
const recordedCard = document.getElementById('recordedCard');

const btnStart     = document.getElementById('btnStart');
const btnStop      = document.getElementById('btnStop');
const btnSave      = document.getElementById('btnSave');
const btnRetry     = document.getElementById('btnRetry');

const recordButtons = document.getElementById('recordButtons');
const postButtons   = document.getElementById('postButtons');
const statusEl     = document.getElementById('status');
const timerEl      = document.getElementById('timer');

// Recording state
 let mediaStream = null;let mediaRecorder = null;
 let chunks = [];let startTime = null; let timerInterval = null;

// Last recording
 let lastRecording = {
blob: null, url: null, mime: null, durationMs: 0, filename: null
};

function formatMs(ms) {
const s = Math.floor(ms / 1000);
const m = Math.floor(s / 60);
const ss = s % 60;
   return `${String(m).padStart(2,'0')}:${String(ss).padStart(2,'0')}`;
}


  async function ensureCamera() {
 if (mediaStream) return;
    try {
      mediaStream = await navigator.mediaDevices.getUserMedia({
        audio: true,
        video: { facingMode: 'user', width: { ideal: 1280 }, height: { ideal: 720 } }
      });
      preview.src
Object = mediaStream;
} catch (err) {
    statusEl.className = 'u-warning-text';
    statusEl.textContent = `Camera/Mic access failed: ${err.message}`;
    throw err;
  }  }

function setViewRecording() {
 // Show Preview + Start/Stop, hide Recorded + Save/Retry    previewCard.style.display  = '';
recordButtons.style.display = '';
recordedCard.style.display = 'none';
postButtons.style.display  = 'none';
  }

  function setViewPost() {
    // Show Recorded + Save/Retry, hide Preview + Start/Stop
previewCard.style.display  = 'none';
recordButtons.style.display = 'none';
recordedCard.style.display = '';
postButtons.style.display  = '';
}

function startRecording() {
    chunks = [];
    const options = { mimeType: 'video/webm;codecs=vp8,opus' };
try {
 mediaRecorder = new MediaRecorder(mediaStream, options);
} catch (e) {
      mediaRecorder = new MediaRecorder(mediaStream);
    }

 mediaRecorder.ondataavailable = (e) => {
      if (e.data && e.data.size > 0) chunks.push(e.data);
    };

    mediaRecorder.onstop = async () => {
      // Build Blob and URL
      const blob = new Blob(chunks, { type: mediaRecorder.mimeType || 'video/webm' });
      const url  = URL.createObjectURL(blob);
      const durationMs = Date.now() - startTime;

      // Save state
      lastRecording.blob = blob;
      lastRecording.url = url;
      lastRecording.mime = blob.type || 'video/webm';
      lastRecording.durationMs = durationMs;
      lastRecording.filename = `recording_${new Date().toISOString().replace(/[:.]/g,'-')}.webm`;

      // Update timer
      clearInterval(timerInterval);
      timerEl.textContent = formatMs(durationMs);

      // Show recorded view
playback.src = url;
      playback.load();
      playback.play().catch(() => {});
      statusEl.className = '';
      statusEl.textContent = 'Recording ready. You can Save or Retry.';
      setViewPost();

      // Revoke temporary URL later
      setTimeout(() => {
        if (lastRecording.url) URL.revokeObjectURL(lastRecording.url);
      }, 60000);
    };

    // Start recording
    mediaRecorder.start(500);
    startTime = Date.now();
    timerEl.textContent = '00:00';
    timerInterval = setInterval(() => {
      timerEl.textContent = formatMs(Date.now() - startTime);
    }, 200);

    // Buttons
    btnStart.disabled = true;    btnStop.disabled  = false;
    statusEl.className = '';    statusEl.textContent = 'Recording...';


    // Ensure preview is visible while recording
    setViewRecording();
  }

  function stopRecording() {
    if (mediaRecorder && mediaRecorder.state !== 'inactive') {
      mediaRecorder.stop();      btnStop.disabled = true;
     btnStart.disabled = false;   statusEl.textContent = 'Stopping...';
 }
  }

  function blobToBase64(blob) {
    return new Promise((resolve, reject) => {
      const reader = new FileReader();
      reader.onloadend = () => resolve(reader.result);
      reader.onerror = reject;
      reader.readAsDataURL(blob);
});  }

async function saveRecording() {
If (!lastRecording.blob) {
apex.message.alert('No recording to save. Please record and stop first.');
return; }

    statusEl.className = '';    statusEl.textContent = 'Uploading video...';

try {
      const base64 = await blobToBase64(lastRecording.blob);
      const payload = base64.split(',')[1];

      apex.server.process(
        'SAVE_VIDEO',        {
 x01: lastRecording.filename,x02: lastRecording.mime,
 x03: payload, x04: String(lastRecording.durationMs) },

        {
   dataType: 'json',
          success: function () {
            statusEl.className = 'u-success-text';
            statusEl.textContent = 'Saved successfully.';
            apex.message.showPageSuccess('Video saved.');

            // Optional: after save, return to recording view ready for a new recording
            resetRecordingState();
            setViewRecording();          },

          error: function (req, status, err) {
 statusEl.className = 'u-warning-text';
 statusEl.textContent = 'Upload failed.';
 apex.message.alert('Upload failed: ' + err);
}        }    );

    } catch (e) {
 statusEl.className = 'u-warning-text';
 statusEl.textContent = 'Processing failed.';
}}

function resetRecordingState() {
    // Clear last recording, clear playback, reset timer/status
   if (lastRecording.url) {
    try { URL.revokeObjectURL(lastRecording.url); } catch (e) {}
    }
    lastRecording = { blob: null, url: null, mime: null, durationMs: 0, filename: null };       playback.removeAttribute('src');
playback.load();
timerEl.textContent = ''; statusEl.textContent = '';
}

async function retryRecording() {
   // Discard current recording and go back to preview
    resetRecordingState();
    setViewRecording();

    // Ensure camera is active and preview shows stream
 try {
 await ensureCamera();
      // Re-enable Start / disable Stop
      btnStart.disabled = false;      btnStop.disabled  = true;
    statusEl.textContent = 'Ready to record.';
} catch (e) {
      // If camera fails, show warning
    }
  }
  // Wire events
  btnStart.addEventListener('click', async () => {
    try { await ensureCamera(); } catch (e) { return; }    startRecording();
  });

  btnStop.addEventListener('click', () => { stopRecording(); });
  btnSave.addEventListener('click', () => { saveRecording(); });  btnRetry.addEventListener('click', () => { retryRecording(); });


  // Initial view: preview + start/stop
setViewRecording();
})();
Step 3: Add CSS Code to Handle Recording State and UI Transitions
CSS Code
#recorderUI .video-card .card {
padding: 8px;border-radius: 6px;
}

#recorderUI .video-player {
width: 260px; height: 146px;
background: #000;border-radius: 6px;overflow: hidden;
}

#recorderUI video {
 width: 100%; height: 100%; object-fit: cover;
}

#recorderUI .t-ButtonRegion {
display: flex;align-items: center;
gap: 6px; margin-top: 6px;
}

#recorderUI .t-Form-label {
  font-size: 0.9rem;  margin-bottom: 6px;
}
Step 4: Save Video Using AJAX Callback
Use apex.server.process to send the Base64 data and metadata to an AJAX Callback. The PL/SQL process decodes the Base64 content and stores it as a BLOB in the database table.
PLSQL Code
DECLARE
l_blob      BLOB;
  l_filename  VARCHAR2(255) := apex_application.g_x01;
  l_mime      VARCHAR2(100) := apex_application.g_x02;
  l_b64       CLOB          := apex_application.g_x03;
  l_duration  NUMBER        := TO_NUMBER(apex_application.g_x04);
BEGIN
  l_blob := apex_web_service.clobbase642blob(l_b64);

 INSERT INTO video_capture (filename, mime_type, blob_content, duration_ms, created_by)VALUES (l_filename, l_mime, l_blob, l_duration, v('APP_USER'));
apex_json.open_object;
apex_json.write('status', 'ok');
 apex_json.close_object;
EXCEPTION
  WHEN OTHERS THEN
    apex_json.open_object;
    apex_json.write('status', 'error');
    apex_json.write('message', SQLERRM);
    apex_json.close_object;
END;
Conclusion:-
Client-side video recording in Oracle APEX enhances application functionality by enabling real-time video capture directly within the browser. This approach improves user experience, ensures data authenticity, and supports compliance-driven use cases. The solution is reusable and can be extended for multiple business scenarios requiring video evidence.
Output:-
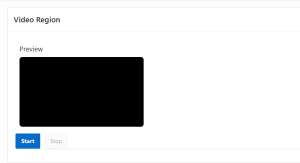
This video recording region allows users to preview the camera feed and start recording by clicking the Start button.
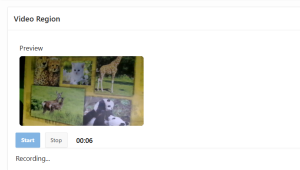
This screen shows the live camera preview while the video recording is in progress, along with the recording timer and status.
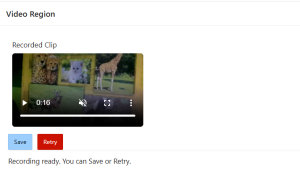
This screen displays the recorded video clip, allowing the user to preview it and either save the recording or retry.